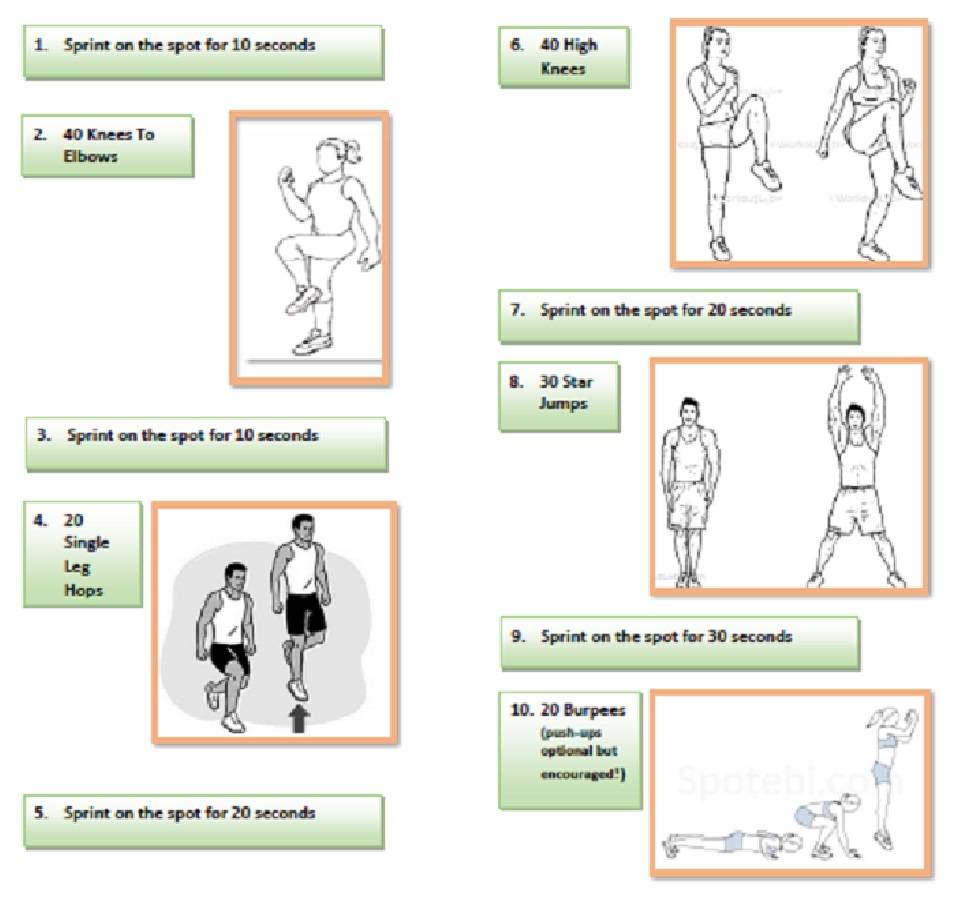
Each week during Lockdown 2021, we’re bringing you a jam-packed circus activity pack to keep you busy at home. We’ll include exercise and warm-up worksheets to keep your circus skills fresh, fun activities like wordsearches and crosswords, and a trick of the week – just for fun! In Activity Pack 6 you’ll find…

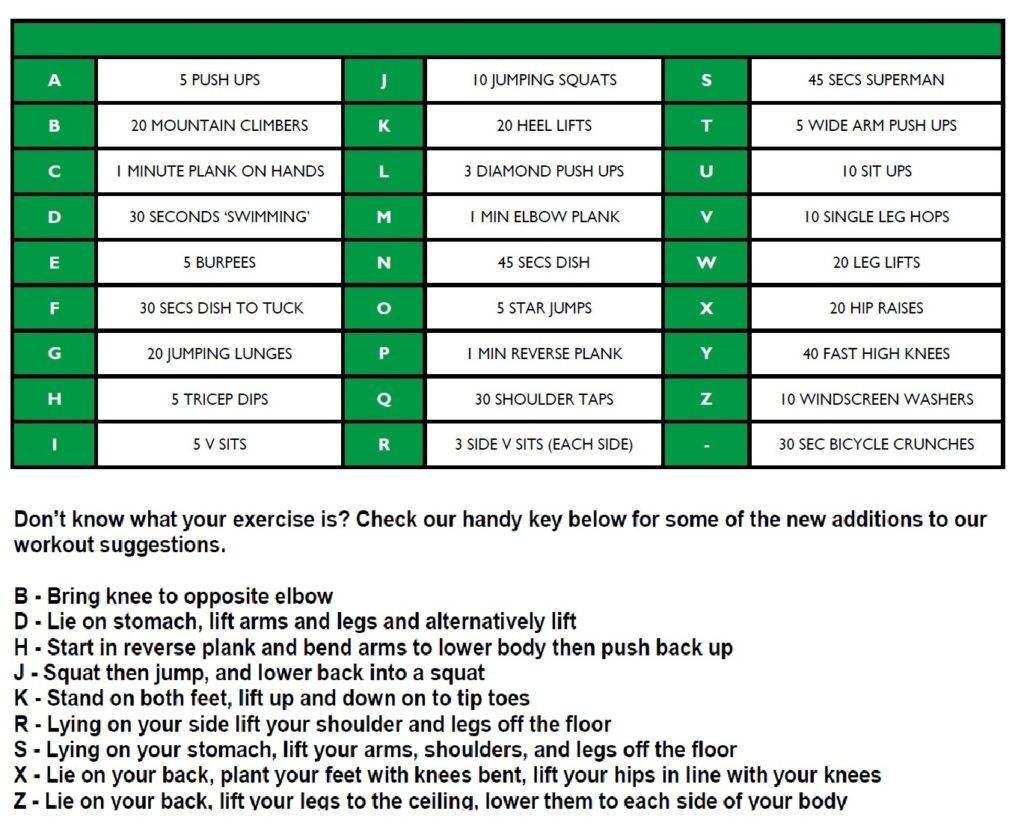
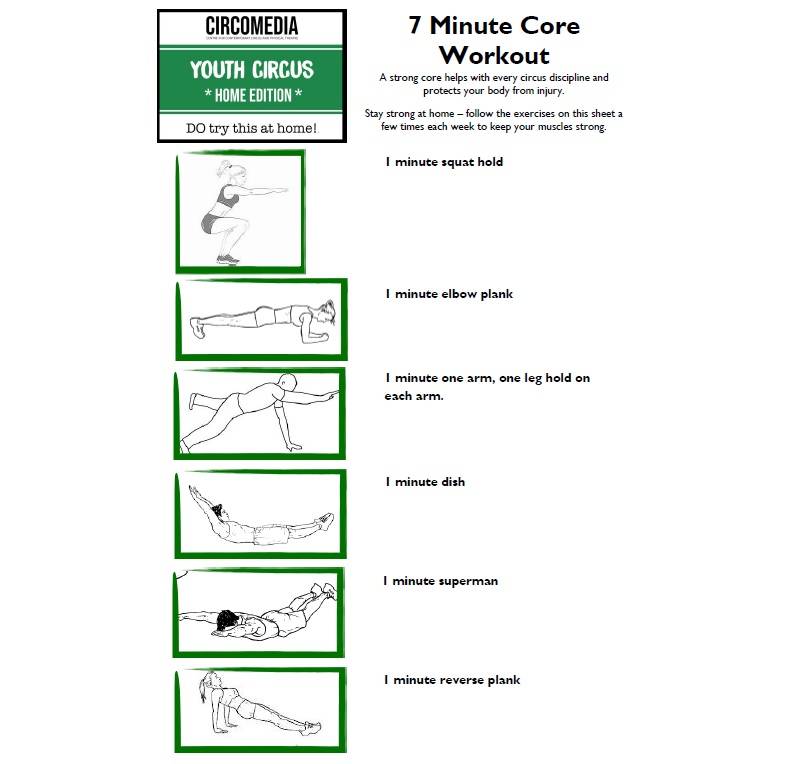
Conditioning: Legs & Core Day – This workout is perfect for strengthening your leg and core muscles!

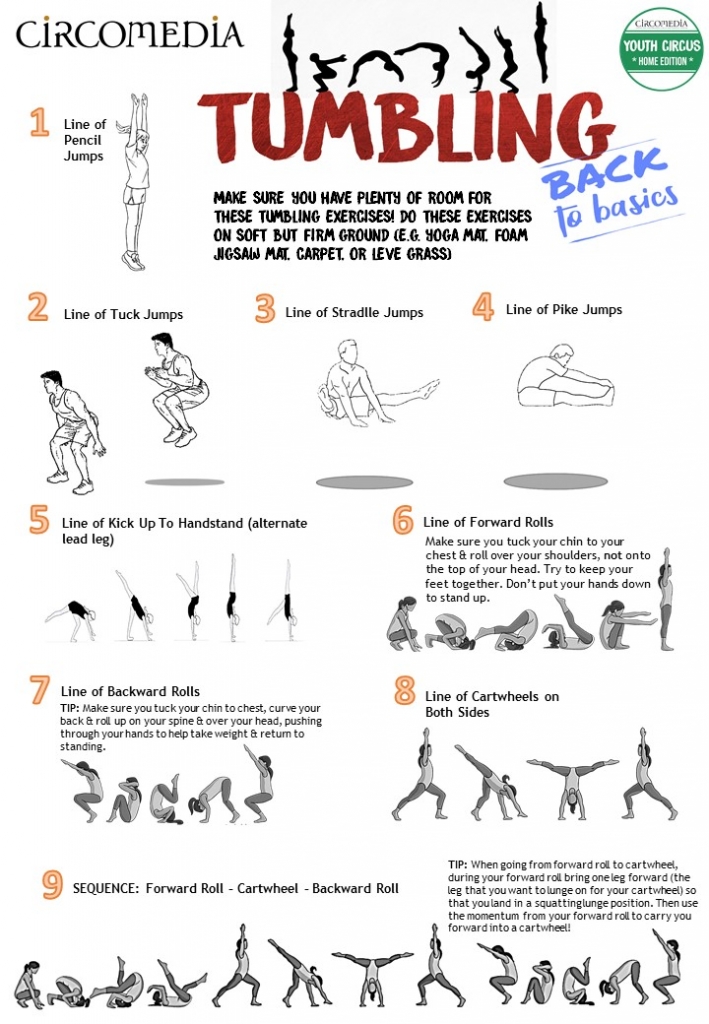
Tumbling Back To Basics – A great tumbling routine to get you back into good habits with your basic moves.

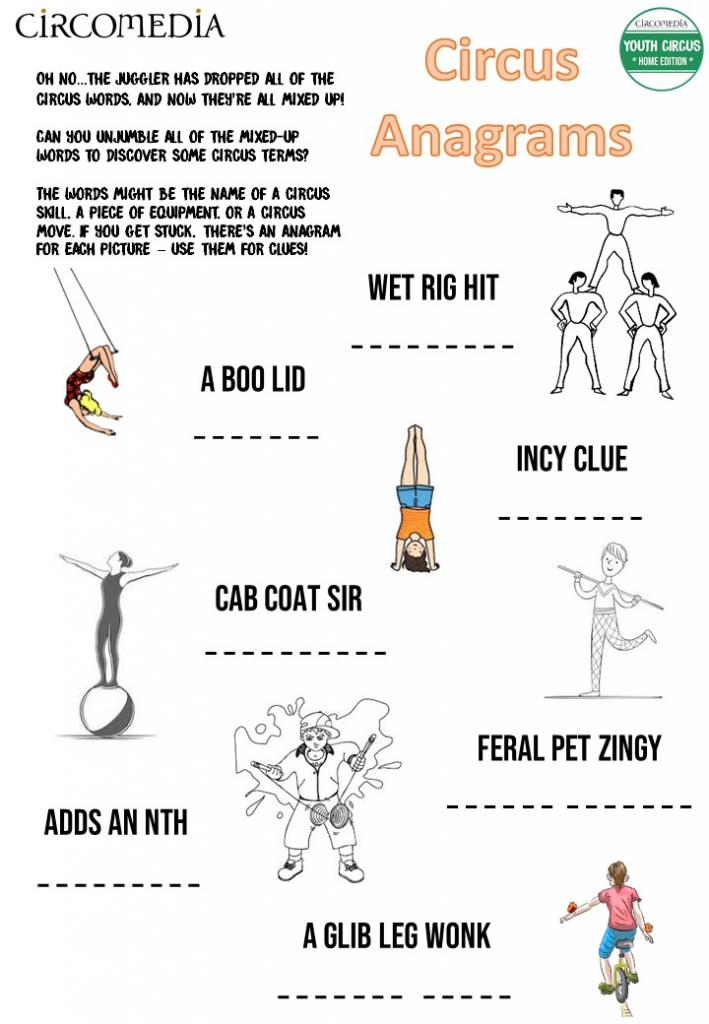
Circus Anagrams – Can you unscramble the circus terms that are all jumbled up?

Trick of the Week: Technical Tea Tasks – Elly demonstrates how to make teatime more exciting – by adding LOTS of hula hoops!

You can download the full Activity Pack 6 here (PDF), or click on the titles to download individual sheets!

Psst! You can check your Circus Anagrams answers here!

Trick of the Week: Technical Tea Tasks

Check out our whole Youth Circus Home Edition Library here!

Each week during Lockdown 2021, we’re bringing you a jam-packed circus activity pack to keep you busy at home. We’ll include exercise and warm-up worksheets to keep your circus skills fresh, fun activities like wordsearches and crosswords, and a trick of the week – just for fun! In Activity Pack 5 you’ll find…

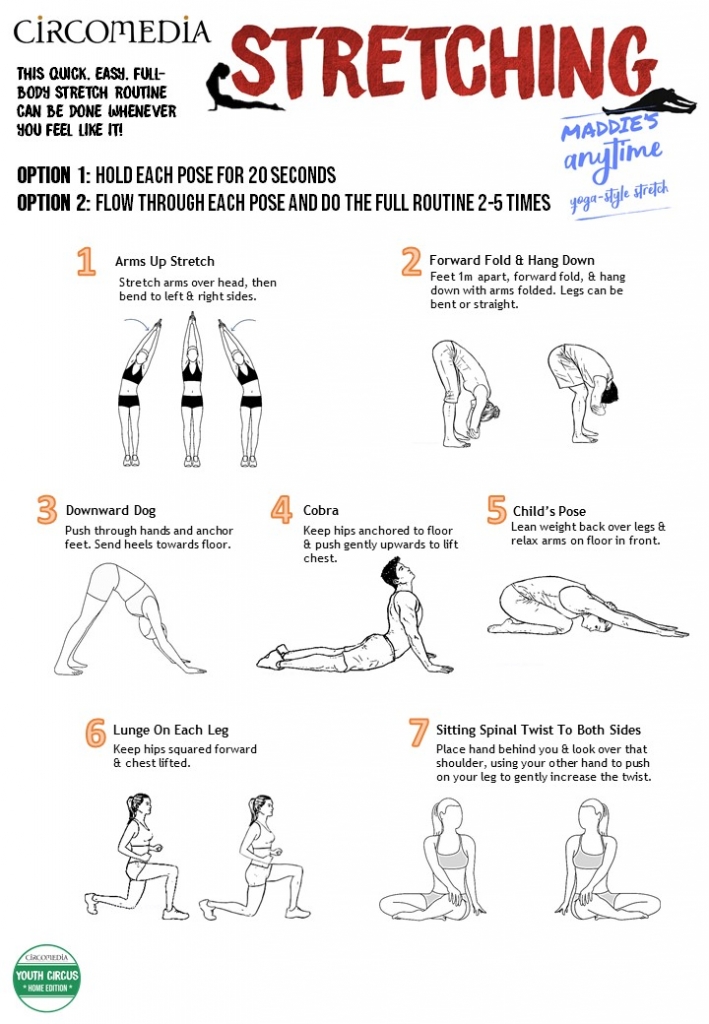
Maddie’s Anytime Yoga-Style Stretch – This full-body stretching routine is quick and simple! Use it to warm up and stretch those muscles.

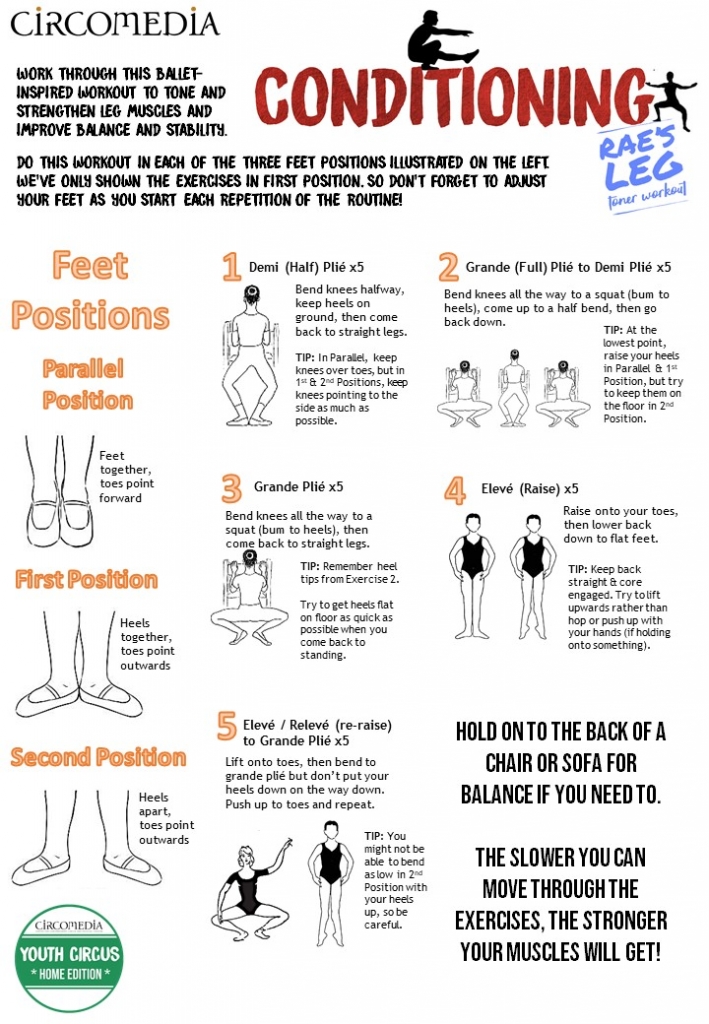
Rae’s Leg Toners – These ballet-inspired exercises will work all of your leg muscles and improve your stability and core strength.

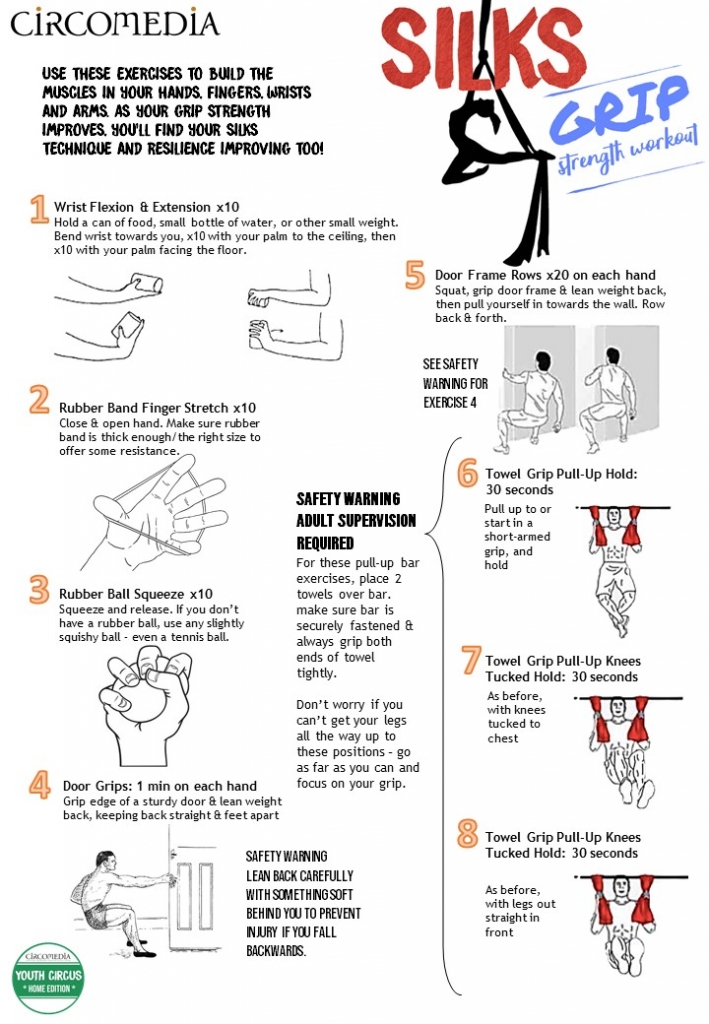
Silks Grip Strength Training – Even if you can’t get in the air right now you can use these exercises to build your hand, finger, and arm muscles in the meantime.

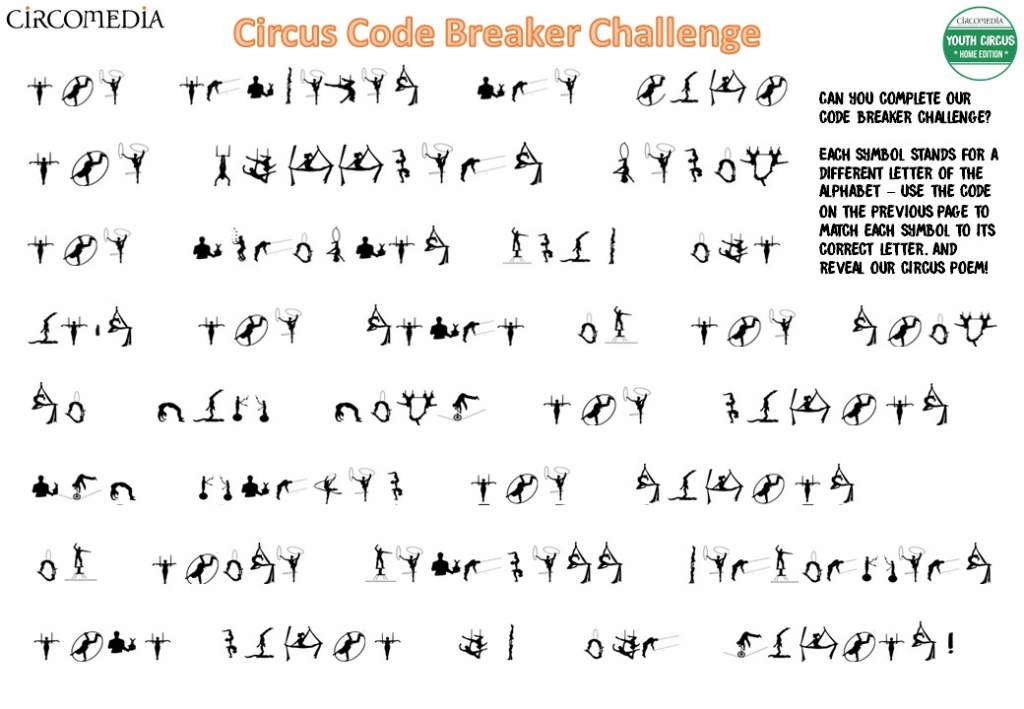
Circus Code Breaker – Can you crack the code? Translate the text, written with circus symbols, to reveal a hidden circus rhyme!

Tricks of the Week: Knot So Simple & Apple Anatomy – Two short tricks this week from Val and Jono! Can you learn to magically tie a knot in the air, or hulk out on an apple?!

You can download the full Activity Pack 5 here (PDF), or click on the titles to download individual sheets!

Circus Code Breaker Challenge (Cipher & Coded Message)

Activity Pack 5 Code breaker cipher
Activity Pack 5 Code breaker

Psst! You can check your Code Breaker answers here!

Tricks of the Week: Knot So Simple & Apple Anatomy

Check out our whole Youth Circus Home Edition Library here!

Each week during Lockdown 2021, we’re bringing you a jam-packed circus activity pack to keep you busy at home. We’ll include exercise and warm-up worksheets to keep your circus skills fresh, fun activities like wordsearches and crosswords, and a trick of the week – just for fun! In Activity Pack 4 you’ll find…

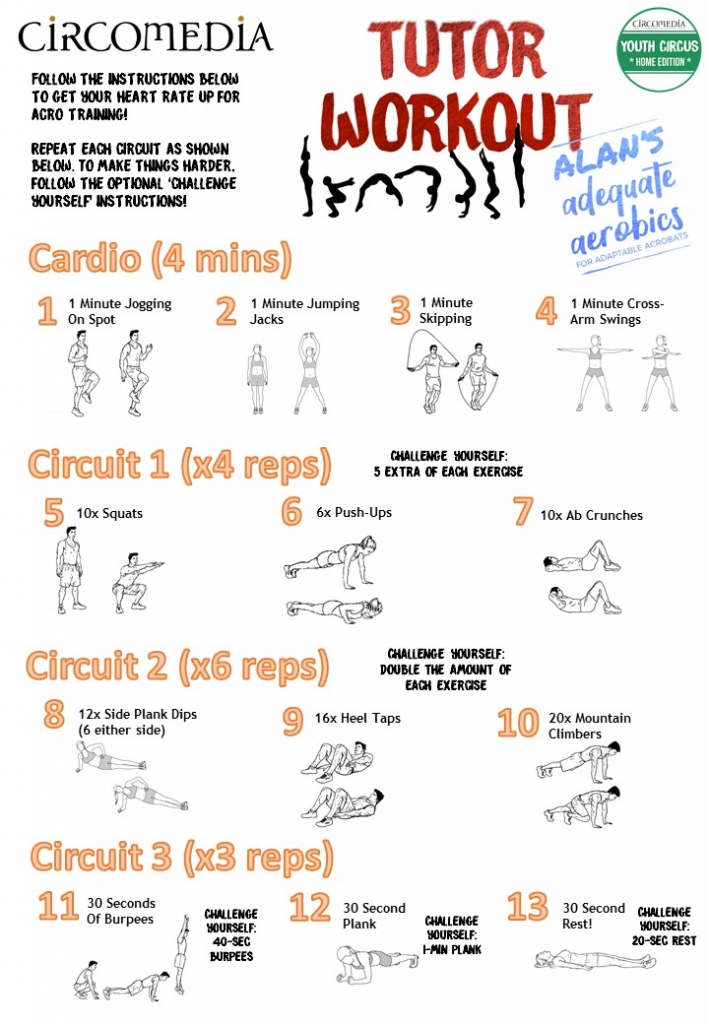
Alan’s Adequate Aerobics for Adaptable Acrobats – It’s a bit of a mouthful! But this aerobic workout will get you warmed up for all things acrobatic.

Handstands Conditioning Workout – It takes some serious strength to hold yourself upside down. Here’s how to train those muscles for increased stability and control.

St Paul’s Spot The Difference – Can you spot the differences in our two (imaginary) tutor party scenes at St Paul’s church? And how many tutors can you spot?

Trick of the Week: Diabolo Dunk – Alan shows off his skills on the basketball court with just a diabolo and a hoop. How far can you dunk from?

You can download the full Activity Pack 4 here (PDF), or click on the titles to download individual sheets!

Psst! You can check your Spot The Difference answers here!

Trick of the Week: Diabolo Dunk

Check out our whole Youth Circus Home Edition Library here!

Each week during Lockdown 2021, we’re bringing you a jam-packed circus activity pack to keep you busy at home. We’ll include exercise and warm-up worksheets to keep your circus skills fresh, fun activities like wordsearches and crosswords, and a trick of the week – just for fun! In Activity Pack 3 you’ll find…

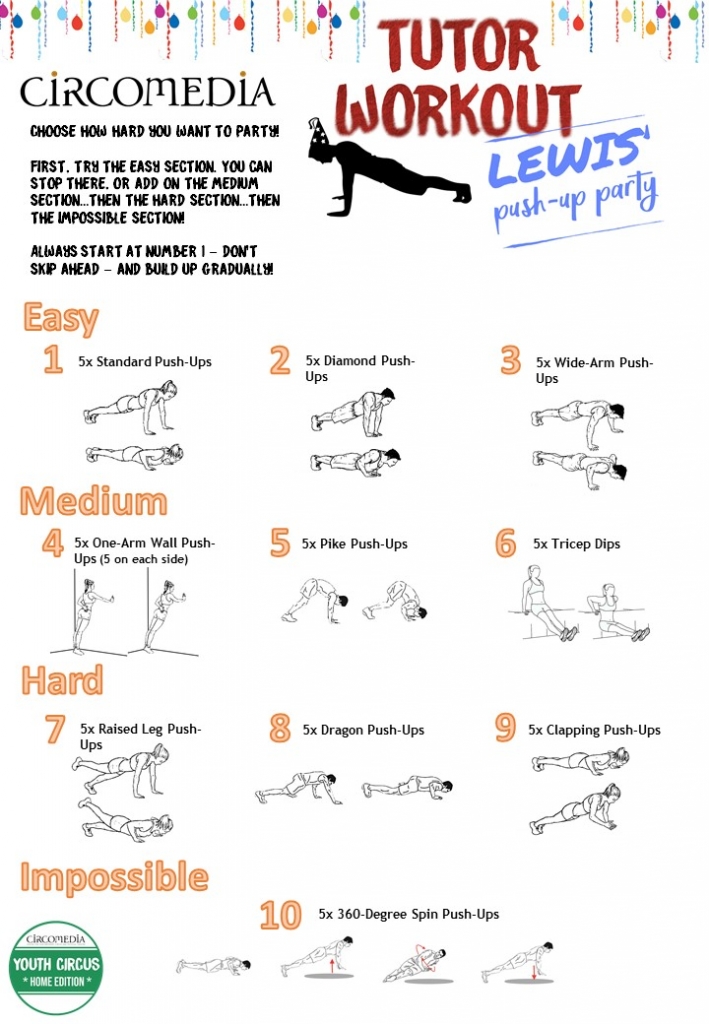
Lewis’ Push-Up Party – Choose a difficulty level, and build up your push-up workout with loads of different variations.

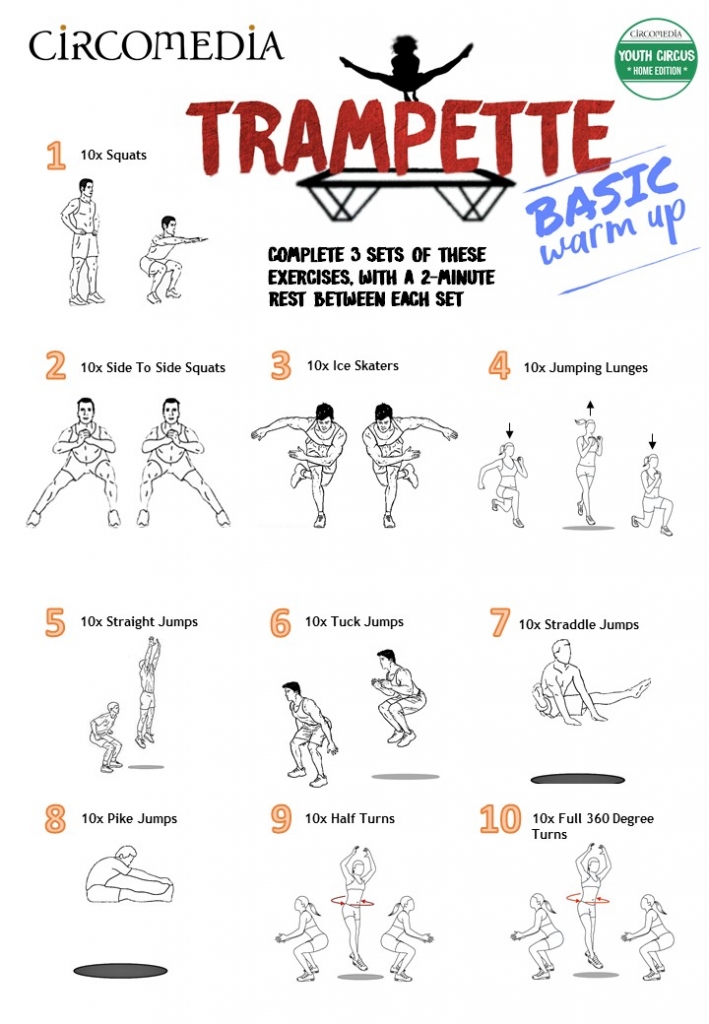
Trampette Basic Warm-Up – If you’re lucky enough to have a trampette or trampoline at home, or if you just want a fun mobility workout, this warm-up is just the thing for you.

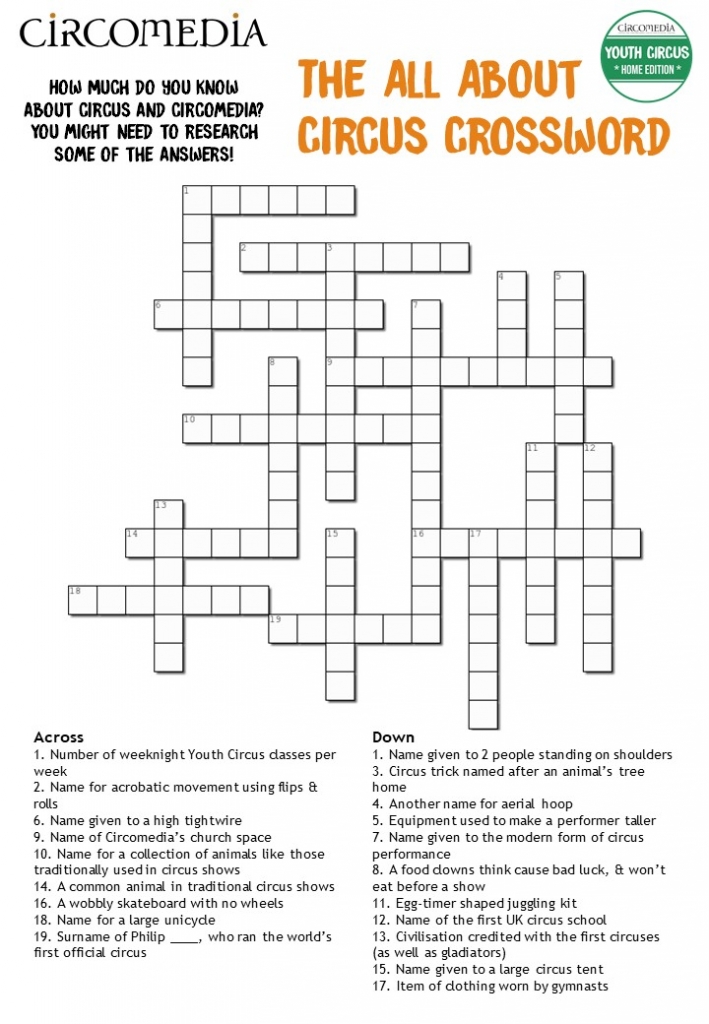
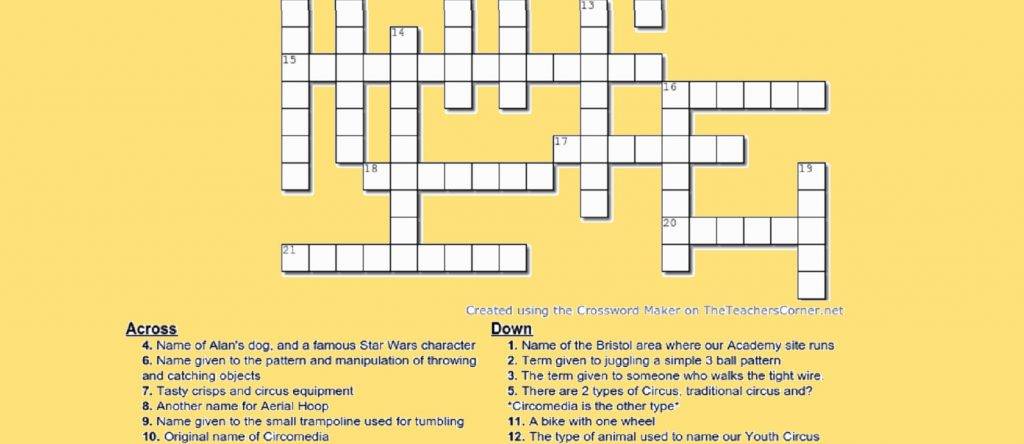
The All About Circus Crossword – How much do you know about circus and Circomedia? You might need to research some of these answers, so it’s a great way to learn more as well!

Trick of the Week: Ping-Pong Palooza – Jono repurposes his cooking things to master a series of ping-pong tricks, bouncing the ball from pot to pan in ever-more elaborate setups! How complicated can you make your ping-pong palooza?

You can download the full Activity Pack 3 here (PDF), or click on the titles to download individual sheets!

Psst! You can check your crossword answers here!

Trick of the Week: Ping-Pong Palooza

Check out our whole Youth Circus Home Edition Library here!

Each week during Lockdown 2021, we’re bringing you a jam-packed circus activity pack to keep you busy at home. We’ll include exercise and warm-up worksheets to keep your circus skills fresh, fun activities like wordsearches and crosswords, and a trick of the week – just for fun! In Activity Pack 2 you’ll find…

Elly’s Abs Ladder – to keep your core strong at home

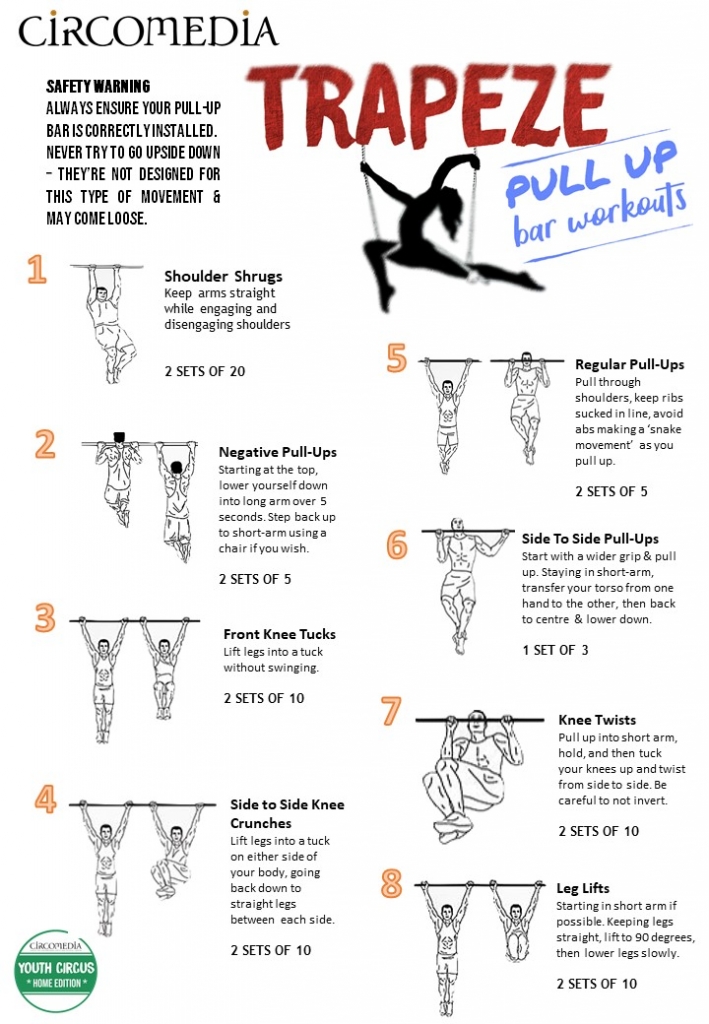
Trapeze Pull-Up Bar Workout (you can fit a pull-up bar to a doorframe quite cheaply, if you don’t already have one at home)

Our Spanish-speaking tutor Valentina has created a fun Circo En Español worksheet – it’s educational, too!

And just for fun, we’ve rounded up some Circus Jokes & Fun Facts!

Last but not least, tutor Rae presents our Trick of the Week: Handstand T-Shirt Trick – can you get dressed upside down?!

You can download the full Activity Pack 2 here (PDF), or click on the titles to download individual sheets!

Trick of the Week: Handstand T-Shirt Trick

Check out our whole Youth Circus Home Edition Library here!

Each week during Lockdown 2021, we’re bringing you a jam-packed circus activity pack to keep you busy at home. We’ll include exercise and warm-up worksheets to keep your circus skills fresh, fun activities like wordsearches and crosswords, and a trick of the week – just for fun! In Activity Pack 1 you’ll find…

Juggling Basic Warm Up – essential for any juggling practice

Tightwire Balance Workout – no tightwire needed!

There’s a fun Circus Skills Wordsearch – perfect for younger students

In our Trick of the Week, Jono makes breakfast more interesting with the Toaster Toss!

You can download the full Activity Pack 1 here, or click on the titles to download individual sheets!

Trick of the Week: Toaster Toss

Check out our whole Youth Circus Home Edition Library here!

Difficulty: Medium

Safety Warning: Be careful not to hit anyone or anything with your clubs as they can hurt or do damage. Make sure you have plenty of space.

Els shows you how to do a clubs 441 trick. 441 is a siteswap, which is a ‘numeric juggling notation…something something…’ – maybe just google it like Els did!

All you need to know for this particular siteswap is what a ‘4’ is and what a ‘1’ is. 4 is a straight double (two rotations of the club in the air) caught with the same hand that you threw it with. 1 is a simple passing the club to the other hand (no throwing). So, a 441 is a double, a double, then a pass from one hand to the other.

Els shows you how to build up to the trick in sections:

This is a very good trick for practising your doubles. To begin with, practice throwing a double and catching with the same hand you threw with. Practice on your right hand and your left hand. Then, put them both together – throw with your dominant hand first.

Next, add in the correct timing – throw the second double before the first one lands, in a ‘one-two’ count pattern.

Before you add the third club, do the same again with two clubs but add in a clap – so double, double, clap. This represents the ‘1’ that you are about to add in.

Finally, add in the third club which simply passes from one hand to the other. Throw one double straight up from your dominant hand, then one double straight up from your other hand, then pass the remaining club from one hand to the other

When you’ve got the hang of this clubs 441 move, try starting with your other hand. That way, you can repeat the pattern continuously – starting with a different hand each time.

If you’ve gotten really good, why not try adding a flourish such as passing the club behind your back? You can add this move to a solo juggling routine, and it also works in passing.

You can see all our clubs and other juggling video tutorials by tagging ‘juggling’ on our Youth Circus Home Edition library page here.

Difficulty: Easy

Safety Warning: Only try this move if you have access to a proper trapeze. Get somebody to spot you and work with a mat underneath. Make sure you are confident with front balance and work through each part slowly at first.

Jono shows you how to do a mini two-part aerial trapeze routine – front balance to half angel. These trapeze moves are both quite straightforward so here you will learn to transition between the two!

First, get into front balance, either by doing a pullover or another way. Once you’re there, make sure the bar is sitting just below your hips and that you feel comfortable and secure in this position.

From here, reach up and place one hand on the rope with your thumb pointing up towards the ceiling. Reach the other hand across your body and place it on the bar with your thumb pointing towards you. These thumb positions are important for having a good grip when you roll over, so make sure you’ve got it right.

When you have a good grip, slowly tip your body onto the diagonal, turning towards the rope that you are holding. Your head will be travelling towards the floor, and your legs will move up towards the rope that is furthest away from your head. The back of your knees should be in contact with this rope. As your legs make contact with the rope, start to twist through your hips.

Keep the rope nice and high on the back of your legs – this will allow you to turn over slowly. As you do, the rope will slowly travel around and down your legs, so that you can eventually hook your feet onto the rope. As you go, slide your hand down the rope so that you can keep lowering yourself.

Flex your feet so that you have a nice firm grip on the rope, and bring your hand off the other rope and stretch it towards the floor. This creates a single mermaid shape. From your mermaid, bring down your top leg and stretch it towards the floor – this creates your half angel shape.

When you’ve been through each move slowly, you can practice transitioning more smoothly. Keep your grip strong and your contact points secure at all times to polish your front balance to half angel!

You can see all our aerial videos by tagging ‘aerial’ on our Youth Circus Home Edition library page here.

Difficulty: Easy

Safety Warning: As always, make sure you have plenty of space so that you don’t hit anyone or anything with your hula hoop.

Elly shows you how to do a hula hoop elevator skip! Start by placing the hoop on the floor, out to one side of your body. Step your leg into the hoop from the front to the back (if you step in the other way, the trick won’t work).

Next, fold the hoop across your body towards the opposite hip and catch it in your other hand. As you do this, step your second leg into the hoop as well. Next, fold the hoop up over your head and all the way down to the floor. Keep your hand close to your hip and use your wrist to fold the hoop over your head.

Then, jump or step both legs inside the hoop. Lift the hoop up to waist height and push it around to start waist spinning. Your hula hoop elevator skip is complete! You can pull the hoop out to the side to get more momentum, and add a turn to help the hoop spin around your waist and make it look more fancy.

We’ve got lots of different hula hoop trick videos – you could learn more, and create a routine! Tag ‘hula hoop’ or ‘manipulation’ on our Youth Circus Home Edition library page here to find them.

Difficulty: Easy

Safety Warning: As always, make sure your juggling balls don’t hit anyone or anything, including yourself!

Today, Tom shows you how to do a juggling neck catch. This is a classic juggling move that looks great in any routine. The premise is simple – throw the ball up, and catch it at the base of your neck – but it may take a bit of practice.

Rather than throwing the ball behind you, throw the ball straight upwards. When you lean forwards, the ball will then come straight back down and land on your neck!

It’s important to look at the ball right until it’s at its highest point before ducking underneath. Throw the ball straight up, and follow it with your eyes until it’s at the highest point. Then, lean forward so that you are under the ball, and it lands on the base of your neck.

When it lands, tilt your head back very slightly and lean forwards a little. This cushions the ball and stops it bouncing off.

Don’t throw the ball too high, or it will hurt when it comes down! Throw to about the height of your own head.

When you’ve mastered the juggling neck catch, add in a cheeky look at the audience and a flourish to finish.

You can see all our juggling videos by tagging ‘juggling’ or ‘manipulation’ on our Youth Circus Home Edition library page here.

Difficulty: Medium

Safety Warning: Make sure you warm up your whole body, especially your wrists, arms, neck and core.

Rae shows you how to transition between two classic acrobatics moves, the crow to headstand.

A crow stand is where you balance with your palms on the floor and your knees on your elbows for balance. A headstand is like a handstand, but you balance on your hands and head for support.

To get into your crow stand, crouch down and place your hands flat on the floor/mat. Place the inside of each knee against the back of each elbow or tricep and push into your knees, keeping your arms strong. As you lean forwards, stick your nose out – like you’re trying to sniff something far away. This will help you balance and you should then be able to lift your toes off the floor. Keep your knees bent to keep that contact with the elbows, and try to keep your back straight and strong.

When you’re balanced, tilt forwards until you can put the top of your head onto the mat. Lift your hips and legs up, balancing on your head and hands on the mat.

To come out of your headstand, bring your legs down in a straddle or star shape and lock your knees back into your elbow/tricep muscle. Work on making your feet heavy – this will tilt you back into your crow position. Lightly touch your feet back onto the mat and come up!

When you’ve got the hang of crow to headstand, you can add some flair. Why not make some shapes with your legs when you’re in your headstand?

You can see all of our acro videos by tagging ‘acro’ in our Youth Circus Home Edition library here.

Difficulty: Easy

Safety Warning: Always make sure you have enough space around you, and be careful not to hit anything or anyone with your diabolo – including yourself!

Alan shows you how to do another brilliant diabolo trick – the diabolo magic knot!

First, you need to make sure your diabolo is spinning nice and fast. When it’s spinning well, point your left-hand stick straight across your body so that it’s pointing over to the right.

Bring the right-hand stick up and around behind the left-hand stick so that it goes over the top of the left-hand stick, bringing the string with it. Bring it down in front – now it will be looped over the top of the horizontal left-hand stick. Continue so that the string goes down and around the axle of your diabolo from the right-hand side.

Then, bring it back around, up and over the left-hand stick from the front this time, and then around the diabolo axle from the left-hand side.

Your left-hand stick always stays in the same position, with your right-hand stick doing the journeying.

To release the diabolo, throw it up in the air and point both sticks slightly upwards – this lets the strings slip off the sticks and releases the knot. Alternatively, you can point both sticks down towards the ground to release the diabolo back to its original position.

It sounds tricky, but Alan shows you the diabolo magic knot a number of times. Watch in slow motion, and from an over-the-shoulder view, so that you can get the hang of it!

You can see all our diabolo videos by tagging ‘diabolo’ or ‘manipulation’ on our Youth Circus Home Edition library page here.

Difficulty: Easy

Safety Warning: Only practice aerial tricks if you have the proper aerial equipment at home. Always practice aerial tricks with supervision and protective matting below you.

In this tutorial, Jono shows you how to do a simple trapeze/hammock trick: layout to cradle! Jono demonstrates on a trapeze, but you can easily translate this trick to hammock as well.

To get into a layout, start by sitting on the bar in a sideways position against one of the ropes, with the rope running right up the centre of your back. Place one hand above your head with your thumb pointing down (as if you’re scrubbing your back with a brush!)

With your other hand, hold the rope in front of you at about eye level. Bring your outside leg up and place your foot flat on the rope in front of you, at the same point as your hand. Move this hand out of the way to the rope behind you, again with your thumb pointing down.

Position the rope between your shoulder and neck and start to slowly push the other rope away with your foot. As you do this, push your shoulder back into the rope behind you until your leg locks into a straight position. Your bum will start to lift off the bar, allowing you to bring your other leg up and on top of the leg that is already on the rope. When you’re in this position, continue to push and lift your hips to a nice straight-body position. If you are feeling confident, you can take your hands off the bar and pose!

To move into cradle, keep your legs straight but slowly dip your hips on one side of the bar into a v shape. Keep the rope high on your back as a contact point. Relax your knees to fold over the bar/ropes and lean your head back as another point of contact.

To get out of cradle back to sit, reach your outside hand across to the opposite rope. Hold the near rope with your other hand, and pull yourself across to sit.

Now that you’ve learnt how to transition from layout to cradle, practice switching between the two!

You can see all our aerial videos by tagging ‘aerial’ on our library homepage here.

Difficulty: Medium

Safety Warning: Make sure that you only stretch when your body is warm! You can pull or strain muscles otherwise. Remember, stretches should never hurt – you may feel resistance, but you should not feel pain. With this in mind, ease off if any stretch is painful!

Elly shows you a series of splits stretches to help you improve your flexibility and work towards doing the splits! Before you start, Elly advises doing at least five minutes’ of jogging, star jumps, or another activity that makes you out of breath and warm. This will protect your body from injury as it warms your muscles up and makes them more flexible.

Hold each of these splits stretches for 30 seconds to 1 minute, and remember to do both legs!

Start in a lunge position with your front leg knee above your ankle. Keep your back leg straight, place your hands on the floor, and focus on sinking your hips into the floor.

Next, place your back knee down and sink your hip forward to focus on your hip flexor muscles. Open your chest up and sink your hips down more, and to create a deeper stretch move your legs further apart to sink even lower.

For the next stretch, sink back on your back knee and straighten your front leg to stretch your front hamstring. Then, flex and point your front toe. Maintain a flat back position and sink your chest down to your leg. You can use yoga blocks, or anything similar at home, to build this stretch up.

Elly’s next stretch is another hamstring stretch. Come up to standing with both legs straight in the same apart position, then lean your chest forward and try to touch the floor.

Come back into your lunge position and deepen the stretch by placing your elbows on the floor beside your front leg. Don’t let your front leg roll out to the side!

Next, it’s a pigeon stretch. Cross your front leg over in front of you and fold over it – have a rest! See if you can bend your back leg in this position to deepen the stretch. You can increase the quad stretch by reaching for this back leg with one hand and pulling it towards your body.

Now you’ve gone through your splits stretches, you’re ready to try the splits! Slide into your maximum position and keep your chest lifted. Ease yourself down until you feel resistance, and hold it there. You may need to support yourself with yoga blocks or similar on each side. As you get closer to the floor, try and lift your hands off the floor and up to the ceiling to help with that straight back.

You can see all our stretching, strengthening & toning videos by tagging ‘Strength & Skill’ on our library homepage here!

Difficulty: Easy

Safety Warning: Make sure you have enough space so that you don’t knock anything over or hit anyone with your poi. Also, be careful of hitting yourself with your own poi!

Els shows you how to do poi turns, a simple but visually effective trick for poi learners. To achieve this trick, you’ll spin your poi backwards and then turn 180 degrees and switch to spinning your poi forwards.

Els breaks down the trick into its separate components. First, practice spinning the poi forwards, both at the same time, one on each side of the body. Next, practice spinning the poi backwards in exactly the same way.

To turn, start spinning backwards. Stop the poi spinning by dropping them behind your shoulders – raise your arms up and over your shoulders. Turn, then start spinning the poi forwards. Once you’ve got the hang of this, speed up the stop and turn to make it a smooth motion.

Next, Els shows you how to start from spinning the poi forwards. From spinning forwards, bring both poi to the front, turn, and switch to spinning backwards. A harder variation is to bring the poi behind your back in order to switch from forward to backward spinning.

When you’ve mastered the basics of poi turns, you can switch between the two as many times as you like!

You can see all our poi tutorials by tagging ‘poi’ on our library homepage here!
Difficulty: Medium

Safety Warning: Make sure you have plenty of space, especially if your cartwheels aren’t 100% controlled. Always get somebody to help you to prevent injury or accidents!

In Three Move Flow, Rae shows you how to transition between three moves to create a brilliant acro sequence!

Start with a basic cartwheel, but instead of coming to your feet bend a knee so that you can easily lower to a casual sitting position. Sitting on the ground with one knee bent, wrap the other leg around you. This allows you to swivel up to standing without using your hands! Instead, push your feet into the ground firmly and untwist your body.

When you’ve got the hang of this, practice reversing the motion to go back to sitting. When you’re back on the ground, keep the leg that’s bent firmly rooted to the ground with the sole of your foot. Flick the other leg round behind you in a fast movement to allow you to spring up. You’ll turn as you spring to standing, arriving in a dynamic pose!

Join all three movements together to create your final Three Move Flow – cartwheel to sitting, spin up and down again, then twist-leap to standing.

Now, practice performing with acro flair!

You can learn more acro moves to string together by using the ‘Acro’ tag on the Home Edition page here.

Difficulty: Medium

Safety Warning: Always make sure you’ve got room when juggling, and keep control of the balls so that they don’t hit anything – or anyone – around you!

Tom teaches you one of the most famous juggling tricks, Mills Mess! This three-ball trick uses underarm throws to create a wonderfully weaving effect.

To learn this trick, you’ll need to be comfortable with underarm throws and catches using both hands. Once you’ve got the hang of this, position your hands with wrists crossed and two balls in the upper hand.

You’re going to uncross and recross your hands, so that the ball that is on the top ends up on the bottom. As each hand moves, it’s throwing the ball it’s holding to the other hand. Confused? Don’t worry!

A useful thing to remember is that it’s always the same ball that is thrown underarm, every time. Tom shows you a slowed-down version of the trick, and also uses an onion (yes, an onion) to demonstrate this.

Once you’ve got the hang of it, follow Tom’s performance tips to really bring the trick together. Focus on that weaving motion that makes this trick look so fluid!

You can also try going into Mills Mess from a three-ball cascade with an over the top throw.

You can learn other juggling moves by tagging ‘Juggling’ on our Home Edition library page here.

Difficulty: Easy

Safety Warning: Make sure you have plenty of space when hula hooping – remember that they can not only knock things over, but they’ll hurt if you hit yourself or somebody else!

Elly shows you the basics of hand hooping, and teaches you a swapping hands trick to create a hand hoop ‘W’ in the air!

First, start off by learning how to keep the hoop spinning on your hand. Use a right angle hand shape so that your thumb keeps the hoop from slipping further up your arm. Move your whole body up and down to keep the momentum!

Practice catching the hoop and changing direction. Practice on both hands, then learn how to swap hands. Bring your free hand alongside your hooping hand, like you’re clapping your hands together. Then, withdraw your original hand and voila!

When you’ve got the hang of this, you can make a smooth hand hoop ‘W’ shape by doing one spin on each hand before swapping. It looks really cool and is an easy and fun trick to learn!

You can learn other hula hooping tricks by tagging ‘hula hoop’ in our Home Edition library.

View all of our tutorials here.

What’s It All About?

Circomedia Youth Circus Home Edition is a series of online tutorials and activities from your favourite Circomedia Youth Circus tutors!

Developed during national lockdowns in 2020, these circus activities are safe and easy to do in your own home. You’ll find juggling, balancing, acrobatics, strength & skill exercises, arts and crafts and more.

There’s something for every age and skill level, and our expert tutors give you tips for safety and proper technique in each video. You don’t even need your own equipment – we’ll show you how to make some!

Circomedia Youth Circus Home Edition – DO try this at home!

Difficulty: Easy

Safety Warning: Always practice with a crash mat and make sure students are physically spotted by a responsible adult. You should only attempt hammock skills if you have a properly rigged, safe and secure hammock of good quality.

Rachel K shows us a hammock butterfly trick! This visually striking inverted trick is perfect for beginners. It will allow you to get to grips with using the material of the hammock more, and inverting fully to make new shapes.

Once you’re on your hammock, you can spread the material either from seating or standing. You might want to get somebody to help you do this. Then, sit in the hammock with your legs outstretched. Trap the end of the hammock between your feet – cross your feet at the ankle on top of one another to help with this.

Get a good handful of material in each hand and grip tightly as you invert. Bring your legs over your head and push them away from you to flip over. Keep them straight!

You can then play with arching your back, dropping one leg, or bringing a knee forward to change the look of your hammock butterfly.

Spotters can help students by helping their hips get over when inverting.

You can see all of our tutorials here.

Difficulty: Easy

Safety Warning: Always check with a parent before claiming a tomato or other food item for practicing contact juggling…

Els shows us how to practice one of the basics of contact juggling, contact ball isolations. This technically simple but visually effective trick is great because you can practice it with whatever round object you have at home. Ideally use some sort of ball, but otherwise anything works! If you have a ball that looks the same all over, this will help with the illusion of the ball floating as it’s harder to see that the ball is actually slowly spinning.

Contact ball isolations are achieved by moving your hands over a ball to make it look like the ball is staying suspended in mid air, and your hands are just moving around it. Els shows us how to use an ‘incy wincy spider’ motion to turn the ball over and over, using fingers and the thumb of the opposite hand. Keep the ball in roughly the same place at all times to get that ‘floating’ illusion!

It takes some practice to get the illusion right, but you’ll get there! Practice in front of a mirror, or show a family member (without telling them the trick!).

Once you’ve learned the basics of contact juggling, you’ll be able to create more optical illusions to wow your audience!

You can see all our tutorials here.

Difficulty: Easy

Safety Warning: Make sure you have plenty of room, especially when throwing and catching the diabolo!

Alan shows you how to do diabolo stick grinds, moving the diabolo from the string to one of your sticks and keeping it spinning so it stays in place!

This is a great basic trick for students starting to move beyond just keeping the diabolo spinning on the string. You can practice at your own pace, and when you’re confident you can make the trick more complex!

First, Alan shows you how to move the diabolo from your string to the stick in your off hand. Once you have the diabolo spinning smoothly on the stick, hold your sticks at a right angle to one another, as Alan demonstrates. Raise your main hand up above your other hand so the diabolo rolls onto one stick and angle this stick slightly downwards so that the diabolo stays on it.

Alan then shows you some variations to make your diabolo stick grinds more complex, such as hopping the diabolo from one stick to another, or catching the grind from a throw.

Remember, it takes practice, and you’ll have to experiment to see what works for you!

Alan demonstrates with a solid-axle diabolo, but you can also use a triple-bearing axle diabolo.

If you need to brush up on the basics before mastering this trick, check out our Diabolo Basics tutorial.

You can view all our tutorials here.

Difficulty: All Levels

Safety Warning: In Cup balance you will be working with a cup full of water. You should only use a plastic cup, and never a glass.

In the cup balance challenge Sarah tasks you with moving your body around a space all while balancing a cup of water.

Make sure that you are working somewhere you don’t mind getting wet. Outdoors is best, but if you are working inside, try to avoid doing this activity over carpet.

You should also make sure you have permission to do this before you attempt it, just in case things getting a little soggy…

You’ll start your cup balance challenge by placing a plastic cup of water on your forehead.

Next you must try to lie down on your back without touching the cup with your hands.

From here, you will attempt to do a variation on a backwards roll while clasping the cup between your knees as you roll over.

As you straighten your legs out, you release the cup onto the floor and then pop your body out. You will then slide pass the cup through a cobra position and pick the cup up with your teeth.

From here you’ll sit back on to your heels and take your victory sip.

Liked this challenge? Why not challenge a friend to do it with you, and build in some more movement to go with it. Check out Ellissa and Tilly’s choreography challenge for some ideas.

See all our challenges and tutorials here!

Difficulty: Easy to Medium

Safety Warning: When poi spinning make sure you have plenty of space so you don’t hit anything.

In Poi Spinning 4 Jono demonstrates 2 new tricks; the Corkscrew and Turning.

Poi Spinning 4 begins by walking you through the basic pattern needed to achieve the corkscrew.

Starting with just one poi, you can practice spinning out the pattern; one circle above your head, leading into another circle across your legs.

Once you have mastered this pattern, you can add in your second poi. Start by following the seem route as your first poi, and then slowly start to separate out your arms so that the pattern splits.

If you want to try a simpler variation of this trick, Jono also demonstrates a fun sequence using one poi where you jump over it as it passes you by.

Next in the tutorial Jono demonstrates turning while twirling. This is an important part of poi spinning as it allows the performer freedom to start moving.

You’ll be shown how begin practicing by pretending to pass a tray of glasses to someone behind you. First passing them across your body, and then over your head.

Once you’ve mastered this technique it is time to put it to use. Why not go and revisit Elly’s 3 beat weave tutorial, or Sophie’s Butterfly video for ideas on tricks you can build into a routine.

For all our other tutorials, click here.

Difficulty: Easy

Safety Warning: Adult, always spot your acrobats! Make sure you practice on a soft, carpeted surface or mat and don’t continue if it is hurting your head a lot. Be aware of neck safety in particular.

In Headstands 1, Rachel shows you the basics of how to do a headstand!

Learn how to place your hands and head in a triangle position and gently walk your feet in to a headstand position.

You can use any item with corners and straight lines to help you get your triangle shape. Try a yoga mat, a sofa cushion , or even a triangle made from newspaper.

When you have your hands and head in the right place practice walking your feet in. Then gently lift your feet up into your headstand!

If you keep falling out of your headstand, use a wall to balance you. Or, use the edge of a sofa, armchair or bed. Of course, you can also get a family member to spot you!

When you’ve finished, roll your wrists and neck out gently to warm down.

When you’ve mastered Headstands 1, keep an eye out for Headstands 2 coming next week!

You can see all our activities and videos here.

Difficulty: Medium

Jono shows you some partner conditioning exercises for strengthening your arms and legs! Grab a partner from your household, and take it in turns so that you both get a workout.

For all of these exercises, the person doing the exercises needs to lie flat on their back. Their partner resists their efforts to push their arms and legs in different directions.

If you’re spotting, remember to be gentle. You aren’t trying to force your partner’s arms and legs in the opposite direction, you are just offering some resistance to make them work their muscles!

Hold each position for 30 seconds. In the video, Jono will talk you through each exercise and you can then try the workout along with him. There’s even a helpful timer on the video!

  1. With your arms straight up, try to push your arms to the floor while your partner gently pushes them back.
  2. In the same position, move your arms to a 45 degree angle (back towards the floor) and try the same thing.
  3. Hold your arms off the mat above your head. Try to push your arms up to the ceiling while your partner tries to push them down to the mat.
  4. Hold your arms in a Y shape and try to push them to the ceiling, again with your partner trying to push them to the mat.
  5. Hold your arms straight above you and try to push them out to the sides while your partner pushes them in.
  6. With your legs pointing straight up try to push your legs together while your partner uses their arms to resist.
  7. In the same position, try to push your legs apart while your partner tries to keep them together.

When you’ve finished, shake your arms and legs out, and then swap over – it is partner conditioning after all!

You can see all our activities and videos here.

Difficulty: Easy

Safety Warning: Rolla Bolla can be tricky skill to master and falls are not uncommon. Please make sure you have a spotter when working on your equipment. Work in a space with plenty of room and remove anything breakable. If you have any soft matting or foam jigsaw mats you can use them for added safety against falls. Make sure you warm up first to prevent injury.

In Rolla Bolla basics Jono teaches you a few fundamentals needed to start learning this wobbly hobby.

First Jono will show you the correct way to mount a rolla bolla. Always put your foot on the bottom of the board first so that it doesn’t flick up when putting your weight on the top of the board.

Next you can see a few tips for keeping your balance. Keep your body centred over the rolla bolla and use your knees to push your weight in the direction needed to counter balance yourself. This will help you maintain control and allow you to start learning tricks.

Now that you’ve got the basics down you can try some tricks. Jono has a few examples for you. First up you can practice doing a small jump. Focus on pushing through both feet evenly so you don’t tip the board.

Or you can try crouching down on the board while balancing. Squat down while keeping your chest up so you don’t tip your weight forward. This will now mean you can control your balance like when you were standing.

SPOTTING ROLLA BOLLA

Jono gives a few tips for any spotters.

  • Spot the hips – not the hands. This will give you better control of their weight, but also allow them the freedom to move.
  • Spot from behind. If you spot in front of the person they will try to lean forward to reach for you. Staying behind them means they are more likely to stand up straight.
  • Watch the board. The board can twist around a lot. Make sure it is staying in place otherwise it may suddenly fall off the rolla and you and the performer could be hurt.
  • Agree a dismount side. The last thing you want is to be clipped by the board as your performer jumps off. Make sure you both know which side the performer is coming down on.

Once you have gotten these rolla bolla basics down you can start adding in other props. Why not watch some of our other tutorials so you can try juggling balls, poi, or even hula hoops.

You can watch all our tutorial videos here

Difficulty: All Levels

Safety Warning: In How to make a Rolla Rolla, Alan will be using power tools and saws. To avoid injury this should only be done by an adult or under close adult supervision. Always wear the correct PPE.

Alan is back to demonstrate how you can make your very own Rolla Bolla.  He talks you through what you’ll need and shows you step-by-step what to do.

Equipment:

  • Large Pipe – Alan is using 160mm drainage pipe, but 110mm can be used too.
  • Plank of wood – Alan is using 18mm thick to support the weight of an adult
  • Hacksaw or angle grinder
  • PPE
  • Screws and screw driver or drill
  • Rubber/Kitchen Draw Liner
  • Staple gun or strong glue

First Alan shows you how to measure out your piping so that you have an even line all the way around. Next you will carefully cut a groove around the entire pipe so that you can cut through it safely and evenly.

Next you need cut your board to size. To find out the width needed, measure the shoe size of the biggest feet to use the rolla bolla. Then add a few millimetres either side. For the length you should have a slightly wider stance than your hips.

Once you have cut your board, Alan shows you how to attach ‘stoppers’. These are two off cuts of wood that are screwed on underneath the board to prevent it from rolling off the rolla when practicing.

Finally you can add some rubber to the underneath of the board to give your rolla bolla a better grip. Now all thats left is to try it out but remember to have a spotter. For some basic tricks check out Jono’s rolla bolla tutorial here.

All our other tutorials can be seen here.

Difficulty: Hard

Safety Warning: The moves in Standing in Hands Part 2 are difficult because it features advanced tricks. Make sure you warm up first and use a clear, open space so that you have plenty of room. You should make sure you are practicing with an appropriate partner to avoid injury.

Rowan and Aimee are back with their ‘Standing in Hands Part 2’ acro tutorial. If you haven’t done the first video yet click here because it covers everything you need to know going forward.

Diving straight back in Rowan demonstrates how you can smoothly press your flyer directly into a long arm hold. Make sure you have a spotter with you to make sure you can practice safely.

Starting from elbows down position, the flyer leans back slightly as the base pushes up through their body. This subtle lean gives the base momentum to extend their arms and allows them to push the flyer into the correct position.

Rowan then offers some more conditioning exercises to help you become more comfortable as both a base or flyer. The flyer does squats in the bases hands to practice keeping their legs close together.

Once you’ve got the hang of these exercises you can move on to short arm transfers. This is where the flyer balances all their weight in just one of the bases hands.

Rowan and Aimee will give you several tips and exercises on how to ensure you do this safely and with correct technique.

To finish why not try the half twist step in and out. Starting facing towards your base, flyer steps up into the bases hand, with a twist allowing the base to pivot their elbow and realign the flyer to standing in hands.

You can see all our other tutorials to try here.

Difficulty: Medium

Safety Warning: Warm up first, and work at your own pace to avoid over-stretching or pulling muscles. For this workout you will also require space to move around in so remove anything breakable in the vicinity.

In this workout Jono leads you through some of his favourite dynamic aerial tricks that he has turned into ground based conditioning.

Jono takes you step by step through each exercise and explains how it is connected to working dynamic aerial training. You’ll also get side by side comparisons with the aerial trick.

First up Jono shows you some variations of push ups by looking at jumping up on to a higher level and then back down again without losing momentum. This is then followed by ‘dragon push ups’. This is where you alternate your arms and legs into different positions.

Next you’ll do some parachute rolls. These are the simple act of rolling from a dish to an arch. These are really important because we pass through these two positions all the time in aerial without realising.

After this you can try Jono’s squat jump pirouettes. These are designed to help train your coordination in dynamic twists and turns.

The next exercise will see you practicing for your hocks beats and re-catch. Jono has developed a sequence you can use to keep your muscles strong while training your body coordination.

The final exercise looks at your front balance beats and pop to pike. Watch how Jono has developed a sequence of conditioning exercises to help recreate the muscles and energy used to keep this tricks sharp.

Make sure to cool down once you finish your training. If you want to try some more intense conditioning why not try Rowans’ Hanstand conditioning tutorial.

All our tutorials and activities can be seen here.

Difficulty: Easy

Safety Warning: Whether practicing diabolo basics or advanced tricks always make sure you have plenty of height, and a wide, open area to practice. Move anything that is breakable out of the immediate vicinity. And as Jono learns do not practice in high winds.

In this tutorial Jono introduces you to some diabolo basics. If you’ve never tried diabolo before, or you are a beginner looking for some pointers then this video is for you.

Jono starts by demonstrating the correct way to get your diabolo spinning. Start by deciding which way the diabolo will spin. The easiest way is to spin it the opposite way to your dominate hand. So if you are right handed, roll it to the left.

Once your diabolo is spinning you are shown how to keep it spinning. Gently bounce the stick in your dominant hand.

If it starts to tip backwards and forwards watch Jono show you how to correct it by using the strings to ease it back into position.

Now you have mastered getting the diabolo spinning you can start working on tricks. Jono demonstrates 4 tricks that you can try.

The first trick is ‘the throw’. By pulling your string into a tight line you can launch your diabolo upwards. Make sure to keep the string tight so that you are ready to catch it again. To catch it, simply point your stick into the as if you are trying to catch it on the stick itself. This way it will slide back down onto the string.

Next up is ‘the trampoline’. Similar to the throw, first you must pull your sticks apart to make your string tight. This will send your diabolo into the air. Jono then shows you how to bounce it along the string instead of catching it immediately.

After these first 2 tricks you can start practicing flicking your diabolo over your sticks, and making it run along your string. Both tricks are relatively easy, and Jono breaks them down so you can follow along with him.

And don’t worry if you don’t have a diabolo, because Rowan has ingeniously managed to build his own, and he’s going to show you how in his latest tutorial.

You can learn how to make other juggling and manipulation equipment as well as watch all our other tutorial videos here.

Difficulty: Medium

Safety Warning: In this how to make a diabolo video Rowan will be using sharps tools such as carving knives, and secateurs, as well as other tools. This activity should only be attempted with adult supervision, and proper care and attention be paid through out.

In this tutorial Rowan shows you an ingenious way to make a diabolo out of just ice cream tubs and tree branches.

Equipment:

  • 2 Round plastic tubs (Must be the same size & weight)
  • String – Ideally light, tightly woven
  • 4 small screws
  • Gardening Secateurs
  • A carving knife/Pen Knife
  • Screwdriver

To begin with Rowan shows you the type of ice cream tubs he is using to make his diabolo. Any rounded plastic tubs will do, or you could try other objects such a ball cut in half. The important part to remember is that they must be the same size and weight for both sides.

Once you have got the main parts of your diabolo, you’re going to need an axel. This is the small gear in the middle of the diabolo that sits on the rope. Rowan cuts a small section of branch (about an inch) and then starts to carve a groove in to the middle. This is where the string will sit.

The axel should be shaped almost like an hour glass, so once you have carved a groove around the middle, try to deepen the groove and smooth out the sides.

Rowan suggests using 2 screws to attach each side of the diabolo so that it doesn’t unscrew itself while spinning. This can be a little tricky, so he suggests drilling the holes into the axel first before trying to attach the pieces.

Now to make some diabolo sticks. In the video Rowan uses tree branches, but you can use other things like wooden spoons, or a pair of drum sticks. Tie your string around the top of each stick and you are ready to go.

After all that work you’re going need a few tricks to try. So why not check out Jono’s tutorial on some diabolo basics.

Want to build more of your own circus kit? Check out our other How to Make videos and all our tutorials here.

Difficulty: Easy

Safety Warning: Before starting this sofa-batics 2make sure you have a clear space to work in and nothing breakable nearby. To make sure your sofa doesn’t tip over you can push it against a wall. Also check with a grown up that your sofa is suitable to use.

It is important that you have thoroughly warmed up before doing acrobatics. This is part 2 of a 2 part video. In sofa-batics 1 Rachel leads you in a warm up to begin with. To remind yourself of what to do check out her video here.

Once you are ready to dive back in Rachel welcomes you back to sofa-batics with some balances. To begin you are shown how to do a few popular aerial balances; the Front Balance and the Back Balance. You can practice both moves using the arm of your sofa. These are similar shapes to the conditioning exercises ‘dish’ and ‘arch’.

Next Rachel suggests several other balances that you can try including; a bum balance and a knee balance. Both of these can be replicated on other equipment like trapezes or even tight wire.

If you are looking for something more flexible to try then why not have a go at the Y-Stand, Scorpion, and Arabesque. Rachel demonstrates these using the top of her sofa. This also then provides a wall for her to spot herself against.

Alice just did a great tutorial on how correctly do your Y-Stand and Scorpion which you can use to practice.

Once you have mastered the balances you can move on to something more dynamic. Rachel shows you several ways that you can cartwheel across your sofa. You can use the seat cushions, or the arms, or as Rachel demonstrates, you can even cartwheel off the sofa from sitting.

Rachel finishes all this off with an example of what a sofa-batics routine could look like.

To see all our other tutorials click here.

Difficulty: Medium

Safety Warning: You should warm up first, and work at your own pace to avoid over-stretching or pulling muscles.

Jono leads you through a 5 minute arms and legs workout. This workout focuses on individual limb strengthening as each exercise is practiced on one side and then the other.

You will need a weight for the first exercise. In the tutorial Jono is using 1.25kg weight, but you could use something heavier or lighter depending on your difficulty level. A full bottle of water or a even a kettle could be used as an alternative.

First up ‘weight holds’. Hold both arms out straight ahead of you so they stay in alignment with your shoulder. In one hand hold a weight for 30 seconds. At 30 seconds swap hands but keep your other arm outstretched.

Next is ‘single leg squats’. With one leg bent out of the way, sink down on the other and then push yourself into the air. Compress the landing and continue directly into the next squat.

After this do ‘single leg Calf Raises’. Keeping one leg bent up and use control to lift up on to the ball of your foot and back down continuously. At 30 seconds swap legs again.

Then you will do 1 minute of alternating arm and leg plank raises. Lifting opposite arm and leg in to the air and back down. Try to focus on keep your core engaged, and your arms underneath your shoulders.

Finally you’ll finish with 1 minute of Cossack Squats. Stand in a wide straddle, and sink into a deep squat on one side, extend back up, and then sink back down on to the other side.

Once you have finished conditioning you should have a small stretch to cool down your muscles.

If you enjoyed this arms and legs conditioning and want to have a go at another workout why not try Brennas HIIT tutorial?

You can see all our tutorials and other activities here.

Difficulty: Hard

Safety Warning: The standing in hands trick is difficult – Do a thorough warm up. Use a clear, open space, and make sure you are practicing with an appropriate partner. You should always using a spotter.

Rowan and Aimee teach you how to safely base and fly the acrobalance position ‘standing in hands’.

First Rowan walks you through the correct technique for holding your partners foot. The ball of the flyers foot should be sitting in the ball of the bases hand. With two fingers supporting the heel of the foot, the flyer should aim to point their foot slightly.

Rowan then demonstrates how the base uses his legs to help support the flyer through stepping up. First one leg and then the second, just like climbing steps.

If you are basing standing in hands you should squeeze your elbows into your side, and have you arms pointing directly upwards from your elbow.

The flyer needs to stay as tight as possible and allow your base to balance you, rather than trying to balance your self.

After this initial guide to learning standing in hands, Rowan demonstrates a few variations such as;

  • Stepping up with one leg assistance
  • Stepping up with no leg assistance
  • No grip standing in hands

Once you have mastered this first position you can try going to straight arm standing in hands. Rowan and Aimee demonstrate how to safely prepare for the trick.

It is strongly advised to use a spotter when working at this height.

To finish with Rowan and Aimee demonstrate a good conditioning exercise that will help you build up your strength, core, and stability.

If you enjoyed this partner acrobatic exercise you might enjoy Rowan and Aimees’ other tutorial on acrobalance.

And you can check out all our other videos here.

Difficulty: Medium

Safety Warning: Make sure that you are properly warmed up before attempting the Flag. Do something to get your heart rate up like jogging on the spot. Then make sure you’ve had a good stretch through your body.

Alice takes you through a new acrobalance position called the flag. This is a partner acrobatics position and Alice shows you two versions, one easy, and one harder.

Flag easy version: The base (demonstrated by Alice) kneels down on the floor, while the flyer (demonstrated by brother Jake) steps up onto Alice’s thighs with one foot turned across both legs. You will then hold a ‘monkey grip’ which is wrist to wrist.

Jake then lifts up one leg to place it behind Alices’ neck . He flexes his foot, and Alice can lean her weight into it to create a point of contact. The base holds on to the flyers leg to add support to the structure. Finally you can let go of your hands and show off your new flag.

Flag harder version: In this version the base is also standing. However all the mechanics stay the same. You just need cooperative counter balance. We strongly advice having a third person available to spot.

Alice shows you how to stand as the base – knees together and slightly crouched. Jake then steps straight up onto Alices’ legs. If you are the flyer you should not try to lean backwards just yet as this will unbalance your base.

Once your flyer is standing, place your foot behind your bases neck. The base then leans back to counter balance themselves against the weight of the flyer.

If you are both comfortable, the flyer can twist their hips to be squared up and hands can be released to present your impressive new trick ‘the Flag’.

Don’t forget to practice being both the base and the flyer for the flag. This trick does not require the biggest and strongest person to base it. Although Alice is one of our strongest tutors, she is shorter and lighter than Jake. Instead the flag relies on counterbalance, so even the tallest of acrobats can be flyers, though we recommend every pairing start with the easier version first to check they are comfortable with their role.

If you enjoyed this trick and you’re looking for some more partner acrobatic moves why not take a look at Rachels’ video on pyramids? They may be a simpler trick but are perfect to incorporate into a routine if you are looking to string tricks together.

You can check out all our acrobatic and other discipline tutorials here.

Difficulty: Medium

Safety Warning: For practicing any of these club tricks make sure you have plenty of height and are working in wide, open space. You should also make sure you have done a good warm up, especially for your wrists.

In this tutorial one of our Mynah students catalogues a series of his club tricks that you can learn. This video was made by our student for our Virtual Showcase in May, but we thought it was so well edited and demonstrated such a good variety of tricks that we would share it with you as another home edition tutorial.

In this video you see a wide variety of different club tricks to give some inspiration for what move you could learn next.

Why not learn how to club balance? Place one club on top of another before tossing it up into a cascade. You can practice this with peacock feathers or spinning plates as well.

Then see a demonstration of how to pirouette while juggling. This trick is useful for all types of juggling, whether its cigar boxes, diablo, or clubs.

Up next is the shower. Learn how to make your clubs do a double spin. While the double spin is more specific to club tricks, the shower can be used with other props like rings and balls.

Next you look at the club trick ‘claw catches’. You catch the club before it has finished its full rotation and then send it back into its cascading pattern.

We hope you enjoy this fantastic demonstration of different club tricks and that it gives you some ideas for your next trick to try. For more inspiration why not check out Els video on no throw club juggling.

You can see all our juggling videos and other tutorials and activities here.

Difficulty: Medium

Safety Warning: Warm up first, and work at your own pace to avoid over-stretching or pulling muscles.

Jono leads you through a 4 minute core workout. Core strength is really important for any physical activity because it helps prevent injury and keep your body balanced and aligned.

You will be doing 4 exercises over 4 minute. Each exercise begins with a rest position for 20 seconds, followed by the exercise for 40 seconds.

These timings can be increased or decreased to suit the individual. Jono suggests 30 seconds on and 30 seconds off if you want to try an easier variation.

Alternatively you can try 15 seconds off and 45 seconds on if you want a harder workout.

Once you have warmed up you are ready to follow along with Jono.

  • The rest position that starts each exercise is a ‘tuck and roll’. This is a continuous rocking motion that helps to stretch out and relax your muscles. Take nice deep breaths while doing this.
  • Dish – Elevate your shoulders and heels just off the floor and hold.
  • Rest Position
  • Straddle Swaps – Still in a dish position, but this time you hold your legs in straddle and alternate crossing them over each other.
  • Rest Position
  • Pulses – A tiny bounce through your whole body while in your dish.
  • Rest Position
  • Russian Twists – Sitting up, balancing on your bum, with your knees tucked and heels lifted. You should then twist your body from side to side tapping the floor with your hands.

Jono suggests that if at any point you need a break from an exercise you should simply go back to your rest position until you are ready to continue.

Once you have finished the workout you can follow Jono for some cool down stretches as well.

If you want to try some more core exercises then go watch Elly’s core workout tutorial here.

All our other conditioning and circus tutorial videos can be seen here.

Difficulty: Easy

Safety Warning: Clear a space so you have room to move without knowing anything over. Push your sofa against a wall if you can and remove anything breakable nearby.

In Sofa-batics part 1 Rachel shows you some simple, solo acrobatic tricks that you can try using nothing but your body and your sofa. These fun exercises are ideal for households where indoor space is limited.

Follow Rachel as she leads you in a quick warm up and stretch. Start with some jogging either on spot or around the room to get your heart rate up.

Next you can do some star jumps to get your arms and legs moving and ready to work. Finish off your warm up with some arm circles, and hip circles to loosen up your whole body.

After the warm up Rachel shows you a series of different rolls you can do off, on, over, and across your sofa. Each one of these uses techniques we use in all our fundamental acro and tumbling training such as log rolls, forward and backward rolls, and table top position.

Finally Rachel demonstrates different inverts you can try. There are headstands, shoulder stands, and even a variation assisted handstand. Each one of these inverts will then allow you to style and present your legs in different positions, but remember to point your toes.

Keep an out for the next instalment of sofa-batics part 2. Where Rachel will show how to practice different forms of balancing, and cartwheeling using your sofa.

Once you’ve watched Sofa-batics, why not go and see what sofa acro you can try with two people as demonstrated by Tilly and Will in their Couch Acro video.

You can see all our videos and activities here.

Difficulty: Medium

Safety Warning: This juggling technique is trickier than some of our others as your coordination for throwing and catching can change while lying down. Make sure you’ve got a clear space around you with nothing breakable nearby. Using softer objects like rolled up socks instead of balls can help protect your belongings and your face while learning. And remember to warm up your wrists first.

Elly teaches us how to juggle a 3 ball cascade while lying down. First you’ll learn the technique, then the pattern, and then you’ll be shown how to transition into it from a regular cascade to lying down.

You’ll start by practicing your single ball throws while lying on your back. You should be in a comfortable position, and not be holding tension in your neck and shoulders. To ensure a good throw and catch aim the ball at the ceiling directly above your head. Not too low and not too high.

Next Elly teaches you the technique for juggling 2 balls. Your balls should be making an X pattern in the air as they cross paths. Remember to throw them singly and not simultaneously. Try saying the order out loud to help you with the timing ‘throw, throw, catch, catch’.

After you’ve mastered 2 balls its time to move on to the 3 ball cascade. Pick up your third ball, and whichever hand is starting your throws should be the one with 2 in it. It will take some practice to be able to continuously juggle like Elly, but to help make sure to keep switching which hand starts with 2 balls as this will help develop the pathway.

Finally Elly will teach you how to transition seamlessly between a regular 3 ball cascade to lying down and juggling above your head and back up again.

Already mastered a 3 ball cascade lying down? Why not check out Val’s tutorial on Antipodism – foot juggling while lying on your back.

Or you could try some of Tom’s 2 ball juggling tricks lying down.

You can see all our videos and activities here.

Difficulty: Medium

Safety Warning: Make sure you’ve properly warmed up your whole body first. Do something active to get your heart rate up and your muscles warm.

Alice shows us how to do two different acro moves: the Y Stand & Scorpion.

First, Alice shows us how to do the Y Stand or Y Balance. For this, it’s really important to warm up your inner thighs and shoulders first.

Use your hand to bring the same foot up the side of your body, and straighten out with your leg in a Y shape. If you’re not flexible enough to reach your foot straight away, try using a belt or piece of fabric to get your foot up. You can then pull it in gradually to increase your flexibility.

Next, Alice shows us how to do the Scorpion. For this one, make sure you do some side stretches and back stretches to warm up – Alice suggests some moves to try.

When you’re warmed up, lift up one foot behind you and bring it up behind your head, holding on with both hands reaching over the top of your head.

To build up to a full scorpion, you can use a belt or piece of fabric. This allows you to gradually work on getting your foot closer to your head.

Try your Y Stand & Scorpion moves on a regular basis to increase your flexibility. Don’t forget to practice on both sides!

You can see all our videos and activities here.

Difficulty: Medium

Safety Warning: Make sure you warm up your feet and toes thoroughly – follow Val’s exercises below.

Val teaches us some antipodism! Antipodism is foot juggling whilst lying on your back – it;s great fun and you don’t need loads of space.

If you don’t have your own juggling balls, check out our earlier video on How To Make Juggling Balls.

First, Val shows us how to warm up our legs, feet and toes and stretch them out, increasing our mobility and flexibility. When you’re warmed up, you’re ready to start!

Then, Val shows us the correct leg position to start in. Once you’re in position, practice balancing the ball on your toes and move around to see if you can keep it balanced. You can also try balancing the ball on both feet.

Once you’ve got the hang of this, you can learn to throw the ball from your feet to your hands. Follow Val’s tips for keeping the ball in a straight line as you throw it.

Then, you can try throwing a ball from your hand and catching it on your foot! Again, follow Val’s tips for making this catch easier.

You can see all our videos and activities here.

Difficulty: Easy

Safety Warning: As always, be careful of catching yourself, or any surrounding people or objects, with your hoop as you work. Work in a clear open space wherever possible.

In Hula Hoop 3, Sophie shows you how to do an Escalator trick! This great move makes the hoop travel quickly up and across your body.

With the hoop to the side of your body, step the leg closest to the hoop through the middle of your hoop and back. The hoop is now on the middle of your calf.

Swing the hoop to the opposite side of your body, and step your other leg through. You can now bring the hoop up around your torso, over your other arm and head until it’s off your body completely.

Bring the hoop over your head and out to the side and hinge it to the front to catch in your other hand.

Practice it slowly a few times, and then start to build up speed. Eventually, you’ll be able to do it all in one swift motion!

Sophie shows each step of the move in this video, as well as showing you a handy side view.

When you’ve mastered this, you can try a slightly harder version of the Escalator by letting go of the hoop when you swing it across your body. Swing hard to give the hoop enough momentum to travel up your body!

Remember to stamp your foot through the hoop at the right time, to avoid hitting your shin when you swing the hoop.

If you had fun with Hula Hoop 3, why not go back and check out Hula Hoop 1 and Hula Hoop 2?

You can see all our videos and activities here.

Difficulty: Hard

Safety Warning: Make sure you warm up properly first, getting your heart rate up and your muscles warm. Try Maddie’s mobility video to get prepared!

Lewis shows us how to work towards a handstand press with some conditioning drills.

You can download an exercise sheet to help you here.

First, Lewis shows us how to safely warm up our wrists. Then, he gets to work on active flexibility – this is the key to getting your handstand press.

The first exercise Lewis shows us is a Straddle, using a shoe to push our straddle as much as possible.

Next, use a wall to practice your Pike, walking your hands in towards your feet as far as possible.

Finally, work your Handstand Negative as slowly as possible – this will build up your strength. Really focus on holding the hardest part, at the bottom, as much as you can!

The more you practice these moves, the better your handstands will get. Get a spotter to help you if you need to, and remember that the warmer you are, the easier you will find the stretching.

You can see all our videos and activities here.

Difficulty: Medium

Safety Warning: Make sure you warm up before trying these moves. Work at your own pace, and always use a spotter if you need one.

Rowan teaches us some solo balances to add to your acrobalance toolkit!

Don’t forget to warm up your wrists, neck, and back, and get your heart rate up before you begin. A great warm up video is Maddie’s mobility workout.

First, Rowan shows us how to do a Headstand, using your arms and head to balance.

Next, he shows us a variation on getting into a headstand – Crow to Headstand. You can also use this to get out of your headstand!

You can practice Headstand Exercises to improve your balance and core strength, going from tuck, pike or straddle into your headstand.

Another variation on headstand is the Yoga Headstand. If you get this one, you can try a Forearm Stand where your head isn’t taking any of the weight!

Rowan also shows us how to go from a normal Headstand to a Handstand. This one is a bit trickier, and we recommend having a spotter.

Rowan’s acro partner Aimee – one of our current third year degree students – then shows us a Croc Balance, using your hands and elbows to balance on a raised surface.

There’s loads of solo balances to try on your own in this video, and you’ll find the moves easier the more you try them!

You can see all our videos and activities here.

Difficulty: Medium

Safety Warning: Warm up first, and work at your own pace to avoid over-stretching or pulling muscles.

Elly takes us through a great five minute core conditioning workout! Core strength is really important for any physical activity – it helps prevent injury and keep your body balanced and aligned. For circus skills, you’ll use your core strength to balance, invert, jump, land, juggle, throw, catch…just about everything!

You’ll be doing 10 exercises for 30 seconds each. You can download an exercise sheet to follow here, or use our list below.

First, warm up with the mobility exercises that Elly shows you.

Then, you’re ready to start your exercises, doing 30 seconds for each bullet point:

  • Plank, making a nice straight line from your shoulders all the way to your toes
  • Shoulder taps in your plank position, trying not to move the rest of your body
  • Leg circles in tabletop position, on both legs
  • Side plank on both sides
  • Mountain climbers in your plank position, bringing your knee to the opposite elbow
  • Arch hold, lying on your stomach and lifting your toes and shoulders
  • Elbow plank to arms, going up and down and alternating your arms
  • Reverse plank, pushing your hips up to the ceiling
  • Dish, lying on your back and lifting your toes and shoulders
  • Rowing boats, bringing your arms and legs in and out in a dish shape

Elly shows you some variations if you want to make each exercise a bit easier or harder. If you want to push yourself, do this core conditioning workout a few times with a few minutes’ rest in between.

To finish, Elly demonstrates some cool down stretches.

You can see all our videos and activities here.

Difficulty: Hard

Safety Warning: Don’t put any weight on your ‘silk’ – this is just designed to help you practice the wrap! If you are lucky enough to have a proper silk at home, only practice this move if you’ve done it before in class as it’s an advanced move.

Maddie shows us how to practice an advanced silk wrap at home, to take us from S Lock to Curly Wurly. This is perfect if you don’t have your own silk at home!

If you’ve not quite got to this move yet, don’t worry – you can still practice on the ground and it will help when you get to practising it in class!

Once you’ve locked one end of your material to a drawer, or door handle, lie back on the floor to make your silk shape.

To start your S lock, you start in a catchers wrap. Maddie reminds us how to get into this (you can watch her separate video on catchers if you’re not sure) and then shows us how to get into S lock.

Then, Maddie demonstrates going from S lock into curly whirly wrap – from this, you’ll be able to drop in a star shape. You can practice rolling out of this – watching Maddie’s elegant demonstration to help you!

S Lock to Curly Wurly is really useful to try at home, so that when we’re back in class it’s fresh in your mind. It’s also useful to try this one whilst you’re not actually upside down!

You can see all our videos and activities here.

Difficulty: Medium

Safety Warning: Make sure you warm up your feet before you start. This move is quite safe, but always be aware of your surroundings when juggling.

Val shows us how to do foot catches with a juggling ball! In this video, you’ll learn how to do a standing foot catch, neatly catching the ball on your foot as you drop it.

First, Val shows us how to warm up our feet with some exercises to increase mobility and dexterity.

Then, Val demonstrates how to hold the ball on your foot by curling your toes and raising your outside arch. Practise moving your foot around with the ball balanced on it first, to get used to the feel of it. You can also try to walk with it – why not have a race with a partner?

After these warm up exercises, Val teaches us how to kick up the ball, from our foot to our hand. Then, you’ll be ready to practice throwing the ball from your hand to your foot!

This will take a few tries – Val gives us some tips on common mistakes to help with perfecting your throw and catch. Remember to practice your foot catches on both sides!

You can see all our videos and activities here.

Difficulty: Easy

Safety Warning: Hats are quite safe to juggle with, but always be careful not to hit yourself or anyone around you when juggling!

Rachel K shows us how to juggle hats! You can use a proper juggling hat or bowler hat, or a regular baseball cap if that’s what you’ve got at home.

First, Rachel shows us how to throw a hat onto our head. She shows us how to angle the hat correctly and practice throwing and catching it first. When you’re ready to aim for your head, you can spot the inside of the hat to make it easier.

Next you’ll learn how to do a body roll with your hat. Rolling a hat along your arms and across your body looks very cool! Rachel shows us how to curve our arms correctly and flick our wrists to spin it across our bodies.

Both these tricks can be done with a juggling hat or a sun hat. Why not try other types of hats that you have at home? Just remember to ask the owner first!

You can see all our videos and activities here.

Difficulty: Hard

Safety Warning: Couch Acro 3 is a bit trickier than our previous couch videos, so only try this trick if you’re ready. However, practicing on a sofa makes it a bit safer – you still need to make sure the area around you is clear though.

Tilly is back with Couch Acro 3, another video of tricks to try on your own sofa! These tricks are great if you don’t have a lot of space to do acro at home. Don’t forget to check out Couch Acro 1 and Couch Acro 2 as well!

Practising a handstand on a sitting base’s knees is a difficult trick. It’s great for drilling your handstands though, and particularly helps with opening out your shoulders. It also lets you practice handstands on an elevated surface!

Tilly shows us how the base should sit, with their legs firmly locked and sitting up nice and straight. The base can help the flyer up by spotting their hips. Or, they can spot their shoulders and really help the flyer open out their shoulders by locking their shoulder joints with their hands.

Listen carefully to Tilly and Will’s tips on how to avoid wobbling or falling. They also demonstrate how to safely (but not gracefully!) fall onto the sofa if you aren’t secure!

You can see all our videos and activities here.

Difficulty: Medium

Safety Warning: Remember, clubs can hurt if dropped on toes – wear shoes to practice!

You’ll need three juggling clubs for this one. If you don’t have your own, you can order them online.

In Clubs 2, Els is back to show us another great club manipulation move, again with no throwing involved! This three-club windmill move looks really effective and isn’t too hard to learn. But, it will take a bit of practice!

First, Els shows us how to do the move with each club, flipping it up from between two fingers to your forearm and back down again. Practice this move in each hand a few times.

When you’ve mastered this, Els demonstrates how to move the clubs from hand to hand in the sequence. It will feel a bit slow at first, but practice lots, and you’ll be able to get really fast!

Once you’ve watched Clubs 2, go back and see Els’ other no-throw clubs move in her earlier video!

You can see all our videos and activities here.

Difficulty: Medium

Safety Warning: These are quite safe to juggle with, but always be aware of your surroundings and try not to hit yourself with the boxes!

Jono is back with Cigar Boxes 2, showing you some more cigar box juggling tricks!

If you don’t have cigar boxes, check out our video on How To Make Cigar Boxes.

Today you’ll be learning some more complicated cigar box tricks.

First, Jono shows you a Shuffle Out, moving a cigar box from the end of the row to the middle of the row.

Next, you’ll learn how to Switch Ends, moving a cigar box from one end of the row to the other.

The third trick is called a Flair, where you spin each end block as you throw the middle block.

Jono then shows us how to do Take Downs and Take Outs, but this time with the box on the end of the row. If you haven’t tried these yet, check out Cigar Boxes 1 to try this trick.

The final trick is a bit trickier – you’ll be moving the boxes from a Stack to a Line.

Practice these tricks loads, and then try putting them into a routine! Maybe you could combine tricks from Cigar Boxes 1 and Cigar Boxes 2?

You can see all our videos and activities here.

Difficulty: Hard

Safety Warning: Work within your own limits, and always use a partner to spot you where necessary. Make sure your surroundings are safe and secure. Warm up thoroughly before trying any of these moves!

In Handstand Conditioning 2, Rowan takes you through some more exercises for strengthening and improving your handstand technique. For handstands, it’s really important to condition and warm up your wrists, back, neck, shoulders and core.

First, Rowan demonstrates a tuck to handstand. Use the entire length of your leg to straighten out and bring your hips above your shoulders. This helps with your alignment of shoulders and hips. If you find this easy, variations on this are a straddle up and pike up which will also help with your alignment.

Next, Rowan shows us a handstand line exercise, working with a partner to keep your legs in as tight a line as possible while your partner tries to move you.

Another great exercise is an endurance handstand, holding for a certain amount of time against a wall – or freestanding, if you are comfortable with that.

You can work towards doing handstands on a raised platform. Remember to start low and work your way up.

Another partner drill is to work on press/elephant lifts with a partner. The most important part of this is to get your hips up over your shoulders before you lift your toes.

Finally, Rowan shows us shape transitions – going in and out of tucks and straddles into a straight handstand.

Use Handstand Conditioning 1 and Handstand Conditioning 2 to really perfect your handstands!

You can see all our videos and activities here.

Difficulty: All Levels

Valentina teaches you how to say some Spanish circus phrases!

Like all of us, Valentina is missing circus. She’s been part of the Circomedia family for many years, and grew up in Chile where Spanish is her first language. So, to keep everybody occupied, she’s going to share her language knowledge with you!

Ever wondered how to say “I miss being upside down” in Spanish? Or what “los malabares” means? Now, you can learn all the phrases and practice your perfect pronunciation!

You never know, this could be your first step to becoming a multilingual, international circus performer!

We’d love to see you practicing your Spanish circus phrases – why not send us a video?

You can see all our videos and activities here.

Difficulty: Easy

Safety Warning: This is pretty safe when you’re practising on a chair, but if you’re lucky enough to have your own equipment at home make sure you are practising safely.

Maddie shows us how to practice aerial footlocks at home, using just a chair and a long piece of fabric. This is perfect for all the aerialists who are currently stuck on the ground!

You’ll need a long scarf or other piece of material – you could tie a few scarves together, perhaps. Sitting on a chair, with one end over your shoulder to make your ‘silk’ hang vertically, you’ll use a French wrap to start your foot lock. If you need to revise your French wrap, used when you do French climbing, check out Maddie’s earlier video on Silks & Rope Wraps.

Next, Maddie shows you how to bring the silk across the top of the foot and under to create a secure lock. Finally, she’ll show you how to take the wrap off using your foot.

Practice your footlocks loads of times, on both feet. When we come back your memory will be refreshed and ready to go!

You can see all our videos and activities here.

Difficulty: Medium

Safety Warning: Warm up thoroughly before you start – this mobility video from Maddie is ideal. Clear your working space to ensure you don’t hit anything. Work gradually and build up to a full walkover. Use a spotter when you need to.

Rachel K shows you some drills for working towards forwards or backwards walkovers.

First, practice kicking up to a handstand on a wall. Then, go into a bridge stretch to practice pushing your shoulders up and out.

When you have practiced your bridge and handstand kicks, you can use tick tocks to practice kicking over. Use a soft elevated surface, such as a sofa, and gradually progress to a lower surface.

When you have mastered your tick tocks you can practice your bridge stand ups, lowering yourself into a bridge and standing up again. Again, use an elevated surface and get progressively lower until you are touching the floor.

When you are confident with all of these drills, try a spotted walkover. Read our tips below on how to spot walkovers.

Spotting a walkover:

  • The spotter should kneel on the ground just past where the flyer’s hands will touch down.
  • As the flyer places their hands to kick up in to the handstand, the spotter should place thier closest hand on the centre of the flyer’s back, in between the shoulder blades.
  • As the flyer’s hips arrive over their shoulders, the spotter then places their other hand on the flyer’s lower back.
  • The spotter is then well positioned to slow the flyer’s legs lowering to the ground and to assist the flyer in standing up.

You can see all our videos and activities here.

Difficulty: Easy

Safety Warning: Be very careful when balancing on things outside as you won’t have crash mats and the ground can be hard. Make sure you aren’t choosing something too high, and always ask an adult to spot you if needed.

Rachel B shows you how to push your tightwire skills – without a tightwire – using outdoor balancing objects!

In Tightwire 1, Rachel B showed you how to use household objects to practice your balancing in the home. In Tightwire 2, Rachel challenges you to find some safe outdoor objects to practice with.

A kerbstone is a safe and effective tightwire substitute. When you get confident, you could also use a low bench, a low wall, or even – as Tom shows – something to balance on without walking, like some logs.

Rachel shows you how to practice your tightwire moves on a kerbstone. Try your half turn, your dip step, and your sit down stand up moves.

You can also try cartwheels, but remember that this is very tricky – Rachel recommends practicing on a painted line on the floor first.

Can you do all of the tricks shown in Tightwire 2?

You can see all our videos and activities here.

Difficulty: All Levels

Safety Warning: Adults should always supervise children when using glue and paint, and when cutting eye and mouth holes. This one can be messy – make sure you cover the surface you’re working on!

Alice shows you how to make a circus mask using a papier-mâché technique!

Equipment:

  • Round balloon
  • Scrap paper (newspaper, old notepaper, etc.)
  • Paintbrush
  • PVA Glue
  • Water
  • Wool
  • Paint

First, Alice shows you how to cover a blown-up balloon with papier-mâché to create your mask base. She demonstrates using a paintbrush to make sure everything is really smooth, but you can do this with your hands.

It’s important that you make the mask big enough to cover your head and forehead, so that it stays on comfortably.

You’ll need to do 4-5 layers, and dry each layer for 8-12 hours in between. Once it’s dry, you should be able to pull the balloon out of the mask and mark out eye and mouth holes.

When you’ve decided what kind of mask you want to make, you can start building up features like eyebrows and a nose with more papier-mâché.

When all this is dry, you’ll create eye holes and a mouth hole. Now that you’ve learnt how to make a circus mask, your mask is ready to decorate!

You can see all our videos and activities here.

Difficulty: Hard

Safety Warning: Work within your own limits – you can injure yourself if you push too hard. It takes time to build up flexibility!

Rowan talks you through some handstand conditioning moves! Flexibility and strength are both really important for handstands, but also for lots of other circus skills. You can use these handstand conditioning moves even if you’re not practicing for handstands!

First, you’ll be doing pike and straddle holds to work your quads.

Then, Rowan shows you elephant walks to strengthen your hands, arms and shoulders.

Next, you’ll hold a horizontal handstand position for 30 seconds. This will help you perfect your straight line shape on the floor.

You can also try an inverted horizontal handstand position, face up on the floor. Again, this will engage your ribs, shoulders, and everything else you need to perfect your handstand.

Rowan then shows you how to improve your shoulder flexibility with a shoulder stretch.

To learn how to open your shoulders, you can practice kneeling lifts to practice that transition into a handstand. You can add a jump to make this a bit more of a stretch, and work towards arriving in your full handstand.

You can see all our videos and activities here.

Difficulty: Medium

Safety Warning: Don’t put any weight or strength into this – the setup is designed to remember your wraps, not to test the move properly!

Maddie shows you how to practice your silks & rope catchers wraps on the ground, for all silks and rope aerialists who can’t practice right now.

Using an ingenious setup of scarves and drawers, Maddie creates a ‘silk’ along the ground. She then shows you how to get into a catchers wrap from straddle.

Talking you through each step, Maddie demonstrates silk/rope placement, leg moves and arm placement. Finally, she reminds you how to get out of the move!

If you practice these silks & rope catchers wraps at home, hopefully it will refresh your memory! Then, when we are back in class, you’ll be able to get straight back into it.

You can see all our videos and activities here.

Difficulty: Easy

Safety Warning: This one’s pretty safe as the ribbon is soft, but be careful of hitting anybody with your stick by accident! If you are doing cartwheels whilst twirling, follow Rachel’s instructions carefully.

Now that you’ve learnt How To Make Twirling Ribbons, Rachel B shows you how to do some ribbon twirling tricks!

First, Rachel gives you some top tips for not getting tangled when you’re twirling your ribbon, by gripping your stick correctly. Then she shows you how to do small circles and big circles.

Next, you’ll learn a figure of eight. Rachel also shows you how to throw and catch your ribbon, catching the stick AND the ribbon!

Finally Rachel shows you the side to side. Now, you can put all the moves together into a routine!

Once you’re more confident, you can start moving around whilst you’re twirling the ribbon. Rachel demonstrates a cartwheel, but you can do anything – jumps, balances, spins, dances!

You can see all our videos and activities here.

Difficulty: Medium

Safety Warning: Use a third person to spot you if needed. Clear away anything nearby if possible to avoid catching your feet when you go up and down. Most importantly, always ask permission before getting between a family member and the TV!

Tilly and Will are back with Couch Acro 2! In this couch acro video, Tilly shows us how to do a couch acro shoulder stand. The flyer can go upside down on the base’s knees, which makes it a nice secure move for both the flyer and the base. And, if you do teeter too far, you have a nice soft couch to gently fall back on!

Once you’ve watched Couch Acro 2, why not go back and watch Couch Acro 1?

You can see all our videos and activities here.

Difficulty: Medium

Safety Warning: As always, make sure you have plenty of space and remember that hula hoops can hurt if you bash yourself, or others, by accident. If possible we recommend practicing outside!

Elly is back with Hula Hoop 2, to show you more hula hooping tricks! In this video you’ll learn how to move the hoop up your body, from your waist up to your chest This encompasses waist, chest and neck hooping!

First, Elly shows you how to hula hoop on your waist by pushing your belly button forwards and backwards, and engaging your abs. Then, you’ll learn how to hula hoop on your neck by moving from left to right.

You’ll build up to chest hooping by learning how to put each arm into the hoop when you’re neck hooping first. This is difficult, so don’t be discouraged if it takes a while!

When you’ve mastered this, reach both arms up to achieve your chest hooping! Elly also shows you how to start this from pushing the hoop from just under your armpits, or from the waist upwards.

Once you’ve watched Hula Hoop 2, why not check out Elly’s earlier video, Hula Hoop 1?

You can see all our videos and activities here.

Difficulty: All Levels

Safety Warning: Get a parent to help you with the trickier bits like using scissors, pliers, and a needle and thread.

Equipment

  • Dowel wood approx. 1ft (25-30cm) in length
    If you can’t get hold of dowel, you could use any firm, straight stick – even something you pick up on your daily walk could work!
  • Ribbon, between 6ft (2m) -10ft (3m) in length
  • Needle & thread
  • Large keyring
  • Ring screw – the kind you get in picture framing kits
  • Small swivel – often used for fishing lines
  • Pliers
  • Scissors
  • Tape measure

Rae shows you how to make twirling ribbons! This fun and easy How To project is perfect for all ages (with adult help). You can choose any colour ribbon, and you could even paint your wooden stick as well.

Make sure a parent helps you with the tricky bits. Follow Rachel’s instructions on attaching a swivel to the top of your dowel rod, and then attaching it to the ribbon.

You can order all of these items online but you may have them lying around the house, or be able to borrow from a neighbour (at a safe distance, of course).

Once you’ve learnt how to make twirling ribbons, you can start practising with your completed one. Rae shows you some easy tricks to get you started. Next week, we’ll have another video from Rae showing you some more twirling ribbon tricks!

You can see all our videos and activities here.

Difficulty Level: Easy

Safety Warning: Make sure you warm up first, particularly your wrists and shoulders. Work in pairs so that one person can spot the other. Spotters, make sure you are keeping

In this special 2-parter, Alan and Brenna show you all the handstand basics from partner drills to pike ups!

Handstand Basics Part 1 – Easy

In Handstand Basics Part 1, Alan explains how to warm up your arms, wrists and shoulders properly before you start. Then, he shows you a set of partner handstand drills – holding a 45, 30 and 15 second handstand with your partner holding your legs. As you get confident, the spotter can hold on a bit less so that you start to gain your balance!

If you’re just starting out, try these over a few days first as you’ll find it hard work! If you’re a bit more experienced, you can now move on to the second video!

Handstands Basics Part 2 – Medium

In Handstand Basics Part 2, you’ll learn some solo handstand drills. First, Alan shows you two drills against the wall – with your back to the wall and with your stomach to the wall. You can vary how close you are to the wall, and some will feel scarier than others. Go at your own pace and build up to the scarier ones.

Then, Brenna will show you some alternatives to kicking into a handstand. You’ll learn a straddle up, a tuck up and a pike up. For each one Brenna will talk you through correct alignment, and you’ll try each one five times.

Take a break if you need to! If you’re worried about tipping over you can either get somebody to spot you or slightly underreach, so that you don’t reach your tipping point.

Finally, Brenna shows you some great stretching out exercises for opening up your shoulders and combating some of the tension from your drills.

You can see all our videos and activities here.

Difficulty: All Levels

Safety Warning: This challenge uses video call, so make sure you check out the safety and security of your chosen site first. Always make sure you have your parents’ permission to work with your friend(s) online!

Tilly and Elissa show you a great home choreography challenge that you can do remotely with your friends! Using a game called Add On, you’ll build a sequence of moves together until you have a whole finished piece of choreography.

It’s really simple – one of you will do a move, and the other will repeat the first move and add their own move on next. Keep doing this, taking it in turns to add a move on. Soon, you’ll have a whole sequence of moves!

We’d love to see your home choreography! Why not record your videos – either separately, or on a split screen video call, like Tilly and Elissa do? Lots of safe and secure video call providers allow you to record your calls.

Once you’ve recorded your videos, upload them to our secure OneDrive site here. You can also let us know by email if you are happy for your child’s video to be shared on our website, on social media, or both.

You can see all our videos and activities here.

Difficulty: Medium

Safety Warning: This video shows you how to safely practice aerial on the ground, but if you are lucky enough to have a silk or rope at home be careful practicing these climbs in the air!

Missing climbing things at home? Maddie is too! To keep you practicing at home, Maddie shows you how to practice your climbing basics on the ground.

Climbing is mostly used for ascending silks and rope. Perhaps you’re an expert climber, but you need to keep practising to remember it all? Or, perhaps you’ve never had time in class to really master those foot wraps – now’s your chance!

Using a long piece of fabric, Maddie shows you a French Climb wrap and a Russian Climb wrap. You just need to sit on a chair or sofa for this so it’s really easy to practice at home. Practice your climbing basics lots of times, on both feet, so that when we come back to class you can remember everything straight away!

You can see all our videos and activities here.

Difficulty: Easy

Safety Warning: Adults, spot your acrobats! If possible, clear anything hard or breakable out of the immediate vicinity to avoid injury or breakage. These tricks are designed for a small space but do be aware of your immediate surroundings.

Tilly and Will show you some couch acro! Not everyone has lots of space at home, so Tilly shows you a move that is perfect to do in your living room with minimal space.

This move is a sort of partner handstand, using a base (the person supporting) who sits on the sofa and supports the flyer’s legs on their shoulders. Couch acro may look easy, but it’s important to make sure you’re aligned just right. You can also practice going into the move and out of the move in a controlled way!

You can see all our videos and activities here.

Difficulty: Medium

Safety Warning: Make sure you can mount the unicycle safely before you try this – you don’t need to be able to ride it yet. Use a wall, or kind tall person, for balance and try to come off forward if you lose your balance.

In Unicycle 2, Els shows you how to do bunny hops! You don’t need to be able to ride a unicycle properly for this one, but you do need to be able to mount it. If you want to go back to the basics, watch Tom’s beginners’ unicycle video first.

Els shows you how to hop on the spot on your unicycle, holding onto the seat and pulling upwards as you hop on the spot. Once you get really good, you can even move with your hops!

This is a great trick that’s not too hard and looks really cool.

You can see all our videos and activities here.

Difficulty: Medium

Safety Warning: As always with poi, make sure you have plenty of space and won’t hit anything (or anyone!) with your poi!

In Poi Spinning 3, Elly shows you two variations on your 3-beat weave! If you haven’t yet mastered your 3-beat weave, go back to Elly’s earlier video and practice that first.

First, Elly shows you how to do a trick called Under The Leg. You’ll start with your dominant hand and just one poi, learning how to spin one of the poi under your leg on the third beat.

When you’ve got the hand of that, Elly will show you how to add in your second poi. Try with both hands leading to get really good!

Then, you’ll learn the Backwards Weave. For this, you’re reversing the direction of your 3-beat weave.

These are difficult tricks, so don’t worry if it takes you a few tries!

Remember, if you don’t have your own poi, Elly shows you How To Make Sock Poi in an earlier video.

You can see all our videos and activities here.

Difficulty: Medium

Safety Warning: As always, keep your juggling controlled and check your surroundings.

If you haven’t got your own juggling balls yet, why not make 2 balls or more with our How To Make video?

Tom shows you how to juggle 2 balls in one hand!

There are multiple techniques for juggling 2 balls – the most common one is throwing one ball behind the other. But, you can also rotate the balls outwards, which is important for juggling four balls, or rotate the balls inwards. You can also juggle in columns – which, as Tom demonstrates, is the starting point for loads of cool tricks!

Once you’ve mastered columns, you can build up to the Yo Yo, orbits, follows, and even the Machine – although it may take some practice…

Remember, we also have videos on 3 ball juggling, and beginners’ juggling if you’re just starting out.

You can see all our videos and activities here.

Difficulty: Easy

Safety Warning: This one is really safe, but watch out for anything that you might knock over if you get too enthusiastic!

Els shows you how to perfect your arm circles! Arm circles are great for keeping your shoulders and arms strong and mobile at home. They’re easy and fun, and you don’t need any equipment, so they are perfect to try every day.

You’ve all done these in class, but perhaps you’ve got stuck doing one forward, one back. Els talks you through each step slowly, and shows you how to build up to it.

It might take you a few tries, but once you’ve got it, you’ll be windmilling without stopping!

You can see all our videos and activities here.

Difficulty: Easy

Safety Warning: Always ask before repurposing a household object for your circus activities. Luckily, as you’ll be on the floor, you shouldn’t hurt yourself if you fall off, but be careful when balancing on objects that may roll.

Don’t have a tightwire at home? Don’t worry! In Tightwire 1, Rae shows you how to use things from around the home to practise your balance.

Practising your footwork on a flat line is a great way to improve your balance. Rae shows you how to step on to the ‘tightwire’ and move along it slowly, using your upper arms only to balance.

Once you’ve got the hang of your flat objects, try using a slightly thicker round object. This will wobble a little, making balancing harder – just like a real tightwire!

Rae suggests objects like a walking stick, tent pole or hula hoop for Tightwire 1. Can you come up with any more?

You can see all our videos and activities here.

Difficulty: Hard

Safety Warning: These moves are difficult – make sure you warm up first. Use a clear, open space, and make sure you are practicing with an appropriate partner. Always get a third person to spot you if you’re not confident, and skip out any moves you don’t feel comfortable with.

Rowan takes you through some partner acrobalance moves, with help from his acro partner Aimee!

For each partner acrobalance move, Rowan will talk you through the correct technique for the base and the flyer. Make sure you pay close attention, to avoid injury and keep you both safe.

First, he shows you a Calf Stand, and if you are comfortable, shows you how to walk in this hold. Next, Rowan demonstrates a Split Lever – make sure your flyer is comfortable with their splits for this one! If you’re comfortable with this, try the Advanced Split Lever – but be aware this is an advanced move.

The next one is Figurehead – think Titanic! Then, Rowan shows you a variation called Stand Up to Figurehead.

Finally, you’ll learn a Planche Counter-Balance. This one is a good core strengh workout for both of you, but is hard – so don’t worry if it takes a few tries.

You can see all our videos and activities here.

Difficulty: Easy

Safety Warning: This is pretty safe as cigar boxes are nice and light. As always with juggling, make sure that you’re well clear of anything that you could hit or knock over.

Now that you’ve made your own cigar boxes, Jono teaches you some juggling tricks in Cigar Boxes 1!

You’ll learn how to hold your cigar boxes correctly and stack them together. Then, Jono shows you how to do an Elevator, throwing and catching the boxes all at once.

Next, you’ll learn a 3 Box Flash and a Turnaround. Finally, you’ll learn a Takeout – one of the most popular tricks we teach. If you’re feeling really ambitious, you could try a Takeup too!

After Cigar Boxes 1 we’ll have some more advanced videos, so keep your eyes peeled.

You can see all our videos and activities here.

Difficulty: All Levels

Safety Warning: Supervise young children when using scissors. If you are borrowing DVD cases, make sure you have asked permission and stored the DVD disc somewhere safe first!

Jono shows you how to make your own cigar boxes – the ultimate Gentleman Juggler prop – using just a few household items!

Cigar boxes are lightweight blocks for juggling, and can be used by jugglers of all ages and abilities. They are simple and easy to make. All you need is some empty DVD cases, and some elastic bands to hold them together.

But, if you want to get a bit more creative, you can cover the boxes with some wrapping or brown paper and personalise it! We’d love to see your personalised boxes – why not send us a picture?

In his next video, Jono shows you some juggling tricks with your new cigar boxes!

You can see all our videos and activities here.

Difficulty: Medium

Safety Warning: Younger children will need supervision, as this task involves PVA glue and felt tip pens.

In Circus Costume 2, Tilly shows you how to make your own circus t-shirt! Using a variation of batik technique – using glue/toothpaste rather than wax – you can make your own fantastic design.

Create your own design – a simple design is best – and then draw it onto your t-shirt.

Then, you’ll be using PVA glue – or even toothpaste – to draw over this design. Once it’s dry, paint over the design using acrylic paint and leave it to dry. Once you’ve soaked off the glue, you’ll have a relief outline of your image!

This is a simple and really fun way to customise your own t-shirt or other clothing item. Children of any age can try this, with parents’ help, and you can be as ambitious as you like.

We can’t wait to see your designs when we get back to class!

You can see all of our videos and activities here.

Difficulty: Easy

Safety Warning: Adults, it’s advisable to spot your child as they find their balance. Always use a firm wall to lean on at first, and don’t try it without the wall until you are ready! Wear kneepads, elbow pads and a helmet to avoid injury if you do fall off.

In Beginners’ Unicycle, Tom shows you how to mount and ride your unicycle!

Tom demonstrates how to mount your unicycle using a wall for balance, and how to use the wall to learn how to balance on your unicycle. You’ll need to use the wall for a little while as you find your feet – a bit like using stabilisers on a bike. You can then try coming away from the wall, perhaps using a parent’s hand to help you.

Don’t worry if it takes a while! Take your time finding your balance, and eventually you’ll find it as easy as riding a bicycle.

If you don’t have your own unicycle, you can buy a decent one online for home delivery – if you want any advice on where to purchase one from, drop us an email.

Beginners’ Unicycle is our first unicycle video – keep an eye out for more advanced tricks coming soon!

You can see all our videos and activities here.

Difficulty: Easy

Safety Warning: This one’s pretty safe, but as always, make sure you have enough space. If you have a yoga mat, or can do the moves on a carpeted surface, you might find it more comfortable.

Els takes you through a beginner conditioning routine! This one is perfect for all ages, and is a great way to get younger students moving in the home.

Els will show you a series of exercises that aren’t too strenuous, but still work your whole body. They are perfect for anyone who wants to get moving and keep strong, but hasn’t done a lot of conditioning before. Parents and other family members could try this with their children!

This is also a great routine to try as a warm-up before moving on to other tricks.

You’ll go through some simple burpees, squats and leg raises first to get warm. Then you’ll do some short holding exercises – front and side planks, a dish, a superman, and finally some tabletop leg raises. Els shows you correct technique for each move with simple, clear instructions.

You can see all of our videos and activities here.

Difficulty: Easy

Safety Warning: This one’s pretty safe, but make sure you follow Alan’s instructions on controlling your juggling to avoid hitting or knocking anything. It’s always best to practice in a clear space where possible.

Alan shows you how to juggle with 3 balls! This is the next step once you’ve mastered scarf juggling, so if you haven’t tried this yet, go back and watch Alan’s 3 Scarves video first.

You’ll learn how high to throw your juggling balls, and then Alan will show you how to throw 2 balls first in a crossover pattern.

Once you’ve practised this, you’ll learn how to throw 3 balls at once in a 1-2-3 pattern, letting them fall on the floor to practice the throws. You’ll build up, catching another ball each time. Soon, you’re throwing and catching all three balls!

This will take practice – don’t be disheartened if it takes you a while to get it. Remember that throwing and dropping is a great way to learn!

If you want some variety, Alan also shows you how to juggle 2 balls in one hand. You can mix this up as good hand-eye coordination practice – and you might even get to juggling 4 balls!

Alan also talks you through some common mistakes, such as juggling too high, juggling with the 3 balls too close together, and moving hands backwards and forwards.

We’ll soon have more advanced tricks from Els and Tom, so keep your eyes out! You can see all our videos and activities here.

Difficulty: Medium

Safety Warning: Make sure you have plenty of space. Practice away from siblings, parents, pets, or breakables!

In Poi Spinning 2, Sophie teaches you a fantastic new trick called The Butterfly!

First, learn the arm movement – without using the poi – to get used to the journey of your arms. Then, you’ll gradually let your poi out and speed up your arm movements, until you are at full length.

Sophie talks you through hand positioning and how to bring the movement from your shoulders to your wrists to get that fantastic fast spinning motion! Take your time learning this move – it’s all about controlling your poi.

If you haven’t got your own poi, watch our How To Make Sock Poi video first!

You can also learn a 3-Beat Weave in our Poi Spinning 1 video with Elly.

You can see all our videos and activities here.

Difficulty: Medium

Safety Warning: Clubs can cause damage, and can hurt if you drop them on your toes! Even though you’re not throwing the clubs in this move, be careful when you’re handling them. You don’t need lots of space but it’s always best to practice in a clear space.

Els shows you a no-throw clubs juggling move – the ‘violins’ move! This is a great visual move that doesn’t involve throwing. But, the catching is quite tricky!

You need your own set of juggling clubs for this one, but you don’t need to be able to juggle with them. This move is all about tucking the club under your chin, and dropping and catching it.

Els demonstrates the chin hold and hand placement for catching. She shows you how to transition from one club to the other, and then how to add in the third club!

As with many juggling moves, it’s easiest to start with 1 club and build up.

Remember that it can take time to learn these tricky manipulation moves. Don’t give up if you don’t get it straight away!

If you don’t have your own set of clubs yet, why not order them online?

You can view all of our videos and activities here.

Difficulty: Hard

Safety Warning: Work carefully with your partner, ensuring that you don’t accidentally hurt one another. If you are working with somebody who’s a different size to you, you might need to adjust reps depending on who is the flyer or the base. Follow Rowan’s instructions carefully and use a spotter if you feel unsafe. Don’t attempt candlestick lifts if you haven’t practiced these before!

Time to get circus strong with Rowan! With help from Aimee, Rowan shows you how to do some partner acro conditioning moves to stay strong and toned at home.


It’s often fun to work with a friend or family member when you’re training, and partner acro conditioning moves show you how to work together and help each other.

First, Rowan shows us Partner Push-Ups to work your arms – including how to vary the difficulty. Next, it’s Partner Leg Raises for your core leg strength. The Wheelbarrow Resistance exercise strengthens your core, gluts and upper legs. Candlestick Lifts are recommended if you’ve done the Candlestick acro move before, and will strengthen your core and balance. Finally, Piggyback Squats will work your legs!

You can see all of our videos and exercises here.

Difficulty: Easy

Safety Warning: Make sure you have enough space to practice your hula hooping before you start

Time to dust off your hula hoops and learn a four-trick sequence with Elly!

In Hula Hoop 1, Elly walks you through four moves that you can use to create a stylish sequence! Learn each move first and practice them individually, then string them all together and practice your whole routine.

First, you’ll learn Around The Back To Waist. Then, Elly shows you the Elbow Catch & Flip, followed by a Step-Through move. To finish, you’ll learn a Two-Handed Coin Flip. Add some waist hooping in between, and you’ll have your very own hula hooping routine!

Don’t worry if you haven’t perfected your waist hooping yet – you can still learn these moves and practice your waist hooping at the same time!

If you haven’t got a hula hoop at home, why not order one online? We get a lot of our kit from Oddballs Juggling (and they even have a handy guide to choosing your hula hoop) – but there are plenty of places to order a hula hoop from.

You can see all our videos and activities here.

Difficulty: Easy

Safety Warning: This one’s pretty safe, but keep an eye on flailing arms as you practice this one!

Alan shows you how to take the next step and juggle 3 scarves! If you haven’t watched our Beginners’ Juggling video, you might find it helpful to go back and watch this first. You’ll learn a 2 Scarf pattern here, but Alan will also recap in this video for you.

Once you’re ready for 3 scarves, Alan will teach you how to build up to a cascade pattern in manageable steps. He shows you three patterns, building up the catches in each one, until you can do a full juggle!

Remember, in juggling it’s actually much more important to throw than to catch. So, don’t worry if you drop the scarves whilst you’re learning!

If you don’t have juggling scarves, you can do this trick with any light scarves or handkerchiefs you have. Or, you can use other objects like napkins or even plastic bags!

You can see all our videos and activities here.

Jono’s Friday Cardio Challenge is perfect for getting you moving!

Cardiovascular exercise – or ‘cardio’ – raises your heart rate, gets the blood pumping round your body, and warms you up. It’s really important for general health and fitness. It also makes sure you don’t get too tired when you do lots of circus.

Download Jono’s step-by-step exercise sheet here.

You probably get lots of cardio exercise in your normal daily life. Running around at school with your friends, riding your bike, and doing classes like Youth Circus are all great for cardio. But for now, when it’s not as easy to get OUT and get moving, we thought we’d share some handy exercises to help you stay IN and get moving!

Try the routine with your family – can you do it every day?! The more you do it, the easier it will become!

You can see all our videos and activities here.

Create your own personalised conditioning routine with our Conditioning Alphabet! We’ve matched each letter of the alphabet to a different conditioning exercise in our handy chart below.

Conditioning Alphabet

Spell out your first and last names to create a personalised conditioning routine! Download your printable version here – stick it on the fridge and get your whole family to create their own routine.

If you’ve got a really long name start with one of your names, or a shorter nickname, and work up to your full name. If it’s short, make it a bit harder for yourself (and a bit fairer for those with long names). Include your middle name or nickname!

You can see all our Youth Circus Home Edition videos and activities here.

Difficulty: Hard

Join some familiar faces for a tutor HIIT workout! Get moving after the long Easter weekend with this fun workout from your tutors (and their pets and kids!).

HIIT stands for High-Intensity Interval Training – it’s a great way to get moving, stay strong and improve your overall fitness, and only takes a few minutes.

Brenna walks you through six different exercises for strengthening different parts of your body. Then, you can join Brenna and the other tutors doing the full workout, in 30 second intervals with 10 second breaks.

Don’t be discouraged if you find it hard at first! Brenna gives you some tips at the end for how to build up to it. Or – if you’re finding it super easy – how to make it even harder.

You can see all our Youth Circus Home Edition videos here.

To kickstart your long weekend, Jono’s got a tricky conditioning challenge for you! Can you complete it in one go?

Jono's got a tricky Friday conditioning challenge for you! Can you complete it in one go?

Download your workout sheet here and try to complete all the exercises, following Jono’s tips for doing each move correctly.

This is hard, so don’t worry if you feel the burn – but remember, the more you do it, the easier it will feel and the stronger you’ll get!

You can see all our videos and activities here.

A strong core is essential to keep you supple and injury-free, and it helps with absolutely every circus discipline from juggling to balancing, acrobatics to aerial.

Download your workout sheet here.

Try this 7-minute workout to keep your core muscles strong and supple. Aim for a few times a week – it will feel hard at first, but it will get easier the more you practice!

Your core muscles are the set of muscles located around your tummy and lower back area – they keep you stabilised and balanced, and help you move freely without getting injured. It’s great to have a strong core for any part of life, and you’re using your core pretty much all the time without using it.

For circus skills, you’re using your core every time you balance, bend, turn upside down, swing, jump…the list is endless! Whilst you can’t practice on all your equipment at home, if you work at strengthening your core using this exercise sheet you will find that it’s much easier to start your discipline again when classes start again.

Perhaps your siblings, parents or other family members want to try it too? It’s a great indoor workout!

You can see all of our Youth Circus Home Edition videos and activities here.

Now that you’ve tried some of our tutorials and activities, get stuck in with our Youth Circus Home Edition bingo!

For every activity you complete, tick off a square on the card. Can you complete them all to get a full house?!

Youth Circus Home Edition Bingo

Download your bingo card here and print a copy, or keep a digital version on hand.

Try a new activity every day!

Get your siblings, parents, aunts, uncles, grandparents and pets involved – there’s something for everyone.

Use our video tutorials to help you complete activities, and take pictures or videos of your triumphs!

We’d love to hear from you when you’ve completed all the activities! Send us a picture of your completed bingo card – and evidence, if you have it – to youthcircus@circomedia.com.

Difficulty: All Levels (with adult help)

Safety Warning: Adults need to supervise closely for this one – you’ll be using a drill, so take the lead! Always wear the correct protective equipment.

In How To Make Bucket Stilts, Alan shows you how to make your own bucket stilts using just a few household items. He talks you through what you’ll need and shows you step-by-step what to do.

If you don’t have old paint cans, get inventive – what else could you use? Just make sure you’ve chosen a sturdy base that’s the right size. Remember, it has to take the weight of the stilt walker!

Once you’ve made these, you can stomp around on your stilts like a circus pro.

You can see all our Youth Circus Home Edition videos here.

Difficulty: All Levels (with adult help)

Safety Warning: Younger viewers definitely need an adult’s help with this one. You’ll be using scissors, pins, and either a sewing machine or needle and thread.

In How To Make A Circus Costume 1, Tilly shows you how to create the first part of a fantastic circus costume – a scrunchie!

You can make your own fabulous hair scrunchie using any material you have lying around the house. If you don’t have spare material, you could even use an old item of clothing. Tilly explains what you need and shows you how to do each step of the project.

This is a great beginners’ sewing project as well! Make sure an adult is helping you where you need it, and make as many scrunchies as you want. Perhaps they’d be good gifts for your friends and family too?

We’ll be bringing you more videos on how to make different parts of your costume over the next few weeks.

You can see all our Youth Circus Home Edition videos here.

Difficulty: Hard

Maddie takes you through a quick mobility and flexibility workout.

This one is great for getting you moving, warming you up and stretching you out! Maddie suggests using it as a warm-up before you try some of our other videos. Or, you could do it before you get into some really deep stretching.

Our older students will be familiar with these exercises and can push themselves to try this a few times a week, or even every day! Family members can easily join this one too.

You can see all our Youth Circus Home Edition videos here.

Jono’s been working on a circus crossword to keep you busy at home! All the clues are Circomedia- and circus-related. How many can you get?

Download your full-sized version of the crossword here to print and fill in.

Take a picture of your completed crosswords and send them to us at youthcircus@circomedia.com!

You might need to do some research for some of our circus crossword clues. How much do you know about Circomedia’s history? Do you know the professional words for your circus equipment? Make it into a fun discovery project – maybe you’ll find the answers on our website, or even in our Youth Circus: Home Edition videos!

If you’re itching to check your answers, don’t worry – we’ll post a completed version in a few days!

Difficulty: Easy

Safety Warning: Make sure a grown-up or older sibling is helping with spotting, and follow Rachel’s instructions to keep your backs safe.

In Pyramids 1, Rachel shows you how to create basic pyramids with the other people in your household! You don’t need many people to create these great acrobalance shapes.

This video is perfect for all ages, and siblings and parents can have fun trying these pyramids together!

Rachel demonstrates the perfect tabletop shape, and then shows you how to do a tabletop on tabletop pyramid and a tabletop on two tabletops pyramid. She even shows you a standing tabletop pyramid! Once you’ve mastered that, you’ll learn a single and double sumo squat pyramid.

You can see all our Youth Circus Home Edition videos here.

Difficulty: Medium

Safety warning: Make sure you have enough space! When you practice lots, you’ll be able to control your poi and practice in a small space. But until then, avoid catching siblings, pets, parents and breakable objects with your poi!

Elly shows you some poi spinning moves that are perfect for learning and practicing at home. If you haven’t got your own poi, watch Elly’s How To Make Sock Poi video first!

In this video you’ll learn a three-beat weave. Starting with a two-beat weave, which forms the basis for lots of poi spinning, you’ll work towards three beats with Elly’s guidance. She also shows you how to make your weave look really good by polishing your technique!

You can see all our Youth Circus Home Edition videos here

Difficulty: Hard

Safety Warning: You need plenty of space for this one. Remember, you might not be quite as controlled as Rae when you start out! If possible practice in a garden or big empty space and check your surroundings first. Make sure you ask a grown-up to spot you if you need help.

Rae shows you some advanced cartwheels to build on your basic cartwheel. This video is for students who have already mastered the basics. If you’re not quite there, go back and look at Rae’s video on basic cartwheels first.

You’ll learn a one arm cartwheel, second arm cartwheel, triple hand – or 1,2,3 – cartwheel, a switch leg cartwheel and a stepover cartwheel. And if you’re not totally exhausted after all that, well done!

You can see all our Youth Circus Home Edition videos here.

We’ve hidden the names of our tutors in this wordsearch! Can you find all of them? There are quite a few!

Don’t have a printer? Don’t worry! You can screenshot the wordsearch on a phone or tablet and use a drawing tool to complete it

Jono has created a step-by-step guide for you to draw your very own Circus Big Top! Follow the guide, colour it in and show us your work – email us at youthcircus@circomedia.com with your creations.

Download this guide to follow the step-by-step instructions

Click here to download your step-by-step PDF guide.

Difficulty Level: All Levels

Elly shows you how to make your very own sock poi from…well, socks! Once you’ve made them, she shows you basic moves to try with your new equipment. Elly also demonstrates some longer sequences for you to work towards!

This equipment is easy to make and perfect for anyone, no matter what level you are at. Kids, just make sure you’ve asked an adult before repurposing the laundry.

You can see all our Youth Circus Home Edition videos here.